
How to Use a Knife Sharpening Tool the Right Way

Check the style of the sharpening tool on the counter before touching the blade. Different designs require completely different motions to work safely. To restore a sharp blade, match your technique to the tool by pulling the knife lightly through guided slots, rolling abrasive discs across clamped steel, or gliding across a flat stone. Start on a coarse surface to reshape blunt steel, then finish on a fine surface to polish the edge.
The exact routine depends on your sharpener, your knife style, and the blade condition. Pull-through slots control the angle for you, while stones and rolling systems need manual alignment. Slender Japanese knives typically use a fifteen-degree angle, while thicker Western knives use twenty degrees. A slightly tired blade only needs a brief touch-up, whereas a chipped edge takes more time on coarse grit (the roughness of the abrasive). Here is how to use each system safely.
Match your technique to the specific style of sharpener you own
Every sharpening tool removes metal from a dull blade to build a crisp new cutting point, but each design does that work differently. Using the wrong stroke or dragging a blade through the wrong abrasive slot will scrape the sides of your knife without making it any sharper. Before you make a single pass, identify which tool you have on your counter and how it shapes the metal.
Manual pull-through sharpeners use preset V-shaped slots lined with abrasive materials like tungsten carbide, diamond rods, or ceramic wheels. These tools are built for speed and simplicity. You pull the knife straight through the channel, and the built-in guides hold the steel at a fixed angle for you. They work well for quick kitchen upkeep, though they take off a bit more metal than manual stones.
Rolling sharpeners use a two-part setup: a wooden or metal roller with abrasive discs on each end, and a separate magnetic block that grips the side of your knife. The magnetic block props the blade upright at an exact angle, usually 15 degrees or 20 degrees. You roll the abrasive disc smoothly across the flat side of the edge. This design keeps your angle completely steady without requiring steady hand control.
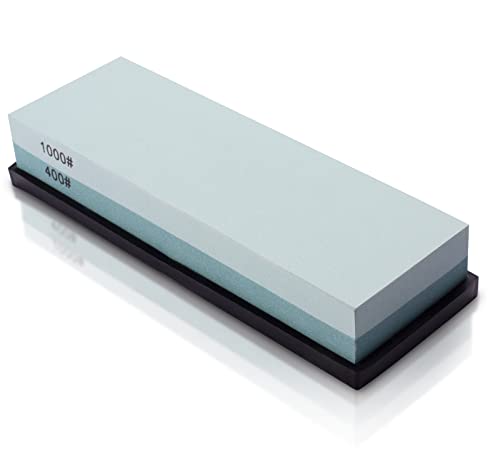
Whetstones, or water stones, are solid abrasive blocks that give you complete control over your edge geometry. A dual-sided whetstone typically features two levels of grit, which is the roughness rating of the abrasive surface. A coarse grit reshapes blunt metal, while a fine grit polishes the edge to a mirror shine. Stones take more practice because you must keep your hands at a steady angle through the whole stroke, but they produce the cleanest, longest-lasting edges on both kitchen cutlery and outdoor pocket knives.
Your sharpening angle depends on how your knife was built. Most Western kitchen knives, such as German high-carbon steel premium knife block sets, feature a sturdy 20-degree utility edge per side that stands up to heavy chopping through squash or bone. Delicate Japanese blades, such as those found in high-carbon Japanese chef knife sets, use a steeper 15-degree slicing edge per side for paper-thin vegetable cuts. Matching your sharpener to that original angle prevents you from grinding away good steel unnecessarily.
Clear a level workspace and lock down your base before you start
Sharpening requires steady hands and a rock-solid surface. If your sharpening stone shifts or your pull-through unit skids across the counter mid-stroke, the blade can jump and cut your fingers or scratch the polished steel. Set up your station cleanly before bringing the knife to the abrasive.
- Wipe and dry the blade completely: Wash off any grease, food residue, or grit with warm soapy water, then towel the blade dry. Oily steel slips out of your grip, and dirt clogs up sharpening surfaces.
- Anchor your sharpening base: Set your tool on a flat, dry countertop at waist height. If your whetstone or pull-through sharpener lacks a non-slip rubber foot, place a damp kitchen towel or a silicone mat directly underneath it so it cannot slide.
- Soak your water stone if required: If you are using a traditional water whetstone, submerge it in a bowl of clean water for 10 to 15 minutes. Watch for tiny air bubbles rising to the surface. When the bubbling stops, the stone has soaked up enough liquid to lubricate your sharpening strokes. Keep a small spray bottle or cup of water nearby to keep the surface wet as you work.
- Clear your elbow room: Remove drying racks, cutting boards, and dirty dishes from your work area. You need room to move your arm in a smooth, continuous line without bumping into kitchen clutter.
Follow the correct sequence of strokes for your chosen tool
Each tool needs a specific motion to sharpen steel cleanly. Find the instructions below for your sharpener style and follow the steps in order.
Using a Multi-Stage Pull-Through Sharpener
- Grip the frame securely: Place your non-dominant hand firmly on the ergonomic handle of the sharpener, keeping your fingers tucked behind the safety guard. Place the unit flat on your counter.
- Seat the heel in the coarse slot: Rest the heel, which is the back end of the blade closest to the handle, into the first abrasive slot. This first slot usually contains coarse diamond or carbide abrasives to reshape dull metal. Keep the blade completely vertical, pointing straight down into the V-groove without tilting to the left or right.
- Pull smoothly toward your body: Draw the knife backward toward you in one continuous motion, applying light downward pressure. As you reach the curved belly of the knife near the point, raise your elbow slightly to follow the curve so the tip stays in contact with the abrasive wheels. Never push the blade forward or saw back and forth in the slot.
- Count your passes evenly: Pull the blade through the coarse slot 3 to 5 times. If the blade was moderately sharp and only needed a quick touch-up, you can skip this coarse stage entirely to save your steel.
- Finish in the ceramic slot: Move the blade to the fine ceramic slot. Pull the knife through another 3 to 5 times using light, gentle pressure. This fine stage wipes away rough metal fuzz and polishes the fresh cutting edge.
Using a Rolling Knife Sharpener
- Attach the blade to the magnetic block: Place the magnetic angle block on your flat work surface. Press the flat face of your knife against the magnetic pad with the sharp cutting edge facing upward. Pick the 15-degree side for thin Asian cutlery or the 20-degree side for standard Western knives. Make sure the spine of the knife sits flat against the table surface so the blade cannot wobble.
- Position the coarse diamond disc: Hold the magnetic block firmly with one hand. Take the roller in your other hand and place the coarse diamond disc flush against the heel of the blade.
- Roll along the edge: Roll the abrasive cylinder back and forth along the full length of the blade, moving from the heel out to the tip. Maintain light, steady contact between the disc and the edge. You do not need to push hard; the diamond abrasive does the work through smooth contact. Continue rolling for about 1 to 2 minutes.
- Check for the burr: Run your clean dry thumb gently across the opposite side of the blade, moving from the spine downward toward the edge (never along the edge). Feel for a burr, which is the microscopic wire edge or curved sliver of metal that forms on the opposite side during sharpening. When you feel that rough ridge along the entire length, this side is done.
- Rotate the blade and repeat: Detach the knife from the magnet, flip it over so the unsharpened side faces out, and reattach it. Roll the diamond disc along this second side for an equal amount of time until you raise a burr there as well.
- Polish with the ceramic side: Flip the roller around to the fine ceramic or smoothing disc. Roll it along each side for about 30 seconds to smooth away the rough wire burr and refine the cutting apex.
Using a Dual-Grit Whetstone
- Set up the coarse stone: Place your soaked whetstone in its non-slip rubber holder with the coarse grit side facing up (usually marked between 400 and 1000 grit). Position the stone so it runs lengthwise away from you or across your body, whichever feels natural for your wrists.
- Find your sharpening angle: Hold the knife handle with your dominant hand and place the blade across the stone. To set a standard 20-degree angle, hold the blade perpendicular at 90 degrees to the stone, cut that angle in half to 45 degrees, and cut that space in half again to roughly 22 degrees. Lower it just a touch more. A good rule of thumb is leaving a gap about the width of two stacked quarters between the spine of the blade and the stone surface. You can also clip a plastic angle guide onto the spine to hold this position for you.
- Execute smooth slicing strokes: Place the fingertips of your other hand on the flat face of the blade just above the edge to guide it. Push the knife diagonally across the stone from heel to tip, like you are trying to slice a thin layer off the top of the block. Maintain consistent angle and light pressure (about the weight of a ripe orange). Pull the blade back smoothly and repeat. Work in sections if your knife has a long blade.
- Form and detect the burr: Continue making passes on the first side (usually 10 to 15 strokes). Gently feel the back side of the steel for that raised burr. Once that rough wire edge runs continuously from heel to tip, you have successfully ground away the old, dull metal.
- Sharpen the opposite side: Turn the knife over. Keep the exact same tilt angle, rest your guide fingers on the blade, and push the metal across the stone for an equal number of strokes until the burr flips back toward the first side.
- Polish on the fine grit: Flip the whetstone over to the fine side (usually 3000 to 8000 grit). Splash a small amount of water on top. Make 5 to 8 light, alternating strokes on each side, switching sides after every pass. This alternating motion snaps off the weak wire burr and hones the edge to a razor-clean finish.
Verify the sharpness of your cutting edge without touching the blade
Testing an edge by running your bare thumb across the steel is dangerous and unreliable. A blade can feel rough and sharp to your skin simply because it has a jagged, torn burr hanging off it, yet it will still crush food rather than slice it. Use simple, hands-off checks to verify your edge.
The standard paper slice is the quickest way to confirm an even edge. Take an ordinary sheet of printer paper and hold it loosely by the top corner with your free hand. Place the heel of your knife on the top edge of the sheet at a slight forward angle, then pull the blade downward through the paper without sawing. A properly sharpened blade glides through the paper cleanly from heel to tip with a quiet hiss. If the blade catches, snags, or tears the paper at a certain spot, that section of your edge still has a blunt spot or an unpolished burr that needs another pass on the fine stone.
The tomato skin check reveals how your knife handles slick surfaces in everyday cooking. Set a ripe tomato on your cutting board. Rest the edge of the blade on top of the tomato skin and pull the knife toward you using only the natural weight of the knife itself. Do not push down with your wrist. A sharp edge pierces the shiny skin instantly and glides into the flesh without flattening or bruising the tomato. If the knife slides across the skin without biting, the edge angle is rounded or the metal is still blunt.
You can also use bright light to inspect your work visually. Stand under a strong overhead lamp and tilt the knife so you are looking directly down at the cutting edge, as if looking down the spine. A dull knife edge has a rounded or flat top that catches the light, showing up as a shiny, reflective silver line. A truly sharp edge is so thin that it cannot reflect light at all. When you look directly down at a finished edge, the silver line should disappear into a sharp, dark seam.
Avoid these common habits that chew up blades and cause slips
Most damage to kitchen and pocket knives happens during sharpening rather than during daily cutting. Avoid these common mistakes to protect your blades and keep your fingers safe.
- Pushing down with heavy force: Pressing hard against an abrasive stone does not speed up your progress. Heavy downward pressure flexes thin blades, gouges uneven hollows into your whetstone, and tears coarse scratches across the bevel, which is the slanted surface that forms the cutting edge. Let the abrasive particles do the cutting under gentle, steady guidance.
- Wobbling your wrist mid-stroke: If your wrist rocks up and down as you move along a whetstone, you change your angle on every pass. This rocking motion rounds off the cutting point into an oval shape instead of creating a crisp, flat V-shape. Keep your wrist locked stiff and move your entire arm from the shoulder and elbow.
- Sawing back and forth in pull-through slots: Dragging a knife backward and forward through a manual slot chips the delicate steel and leaves serration marks along what should be a smooth edge. Always lift the knife out at the end of the stroke, place the heel back at the start of the slot, and pull in one single direction.
- Leaving the wire burr behind: Raising a burr means you reached the center of the dull edge, but leaving that burr attached means your knife will dull after two slices on a cutting board. The thin wire will fold over flat the moment it strikes food. Always finish your session with alternating light strokes on your finest ceramic disc, strop, or fine stone to peel that wire edge away cleanly.
- Letting whetstones run dry: Sharpening on a dry water stone packs metal shavings directly into the stone pores, glazing the surface smooth and causing excessive heat friction that can soften heat-treated blade steel. Keep your water stone wet throughout the entire process.
Select a sharpener that fits your blade shape and skill level
If you are looking to add a sharpening tool to your kitchen or workshop, match the tool to the knives you own and the amount of time you want to spend maintaining them. There is no single style that works best for every user, but picking the right format makes routine knife care much easier.
Manual pull-through sharpeners are ideal for busy home cooks who want sharp knives in thirty seconds without learning specialized hand motions. If you choose this style, look for models that feature at least two separate stages, including a coarse abrasive slot for dull edges and a fine ceramic slot for smoothing. Check that the unit has an ergonomic handle with a wide base and non-slip rubber pads on the bottom so it remains planted on your counter while you pull the knife.
Rolling sharpeners work exceptionally well for straight-edged chef knives, utility knives, and pairing knives. They take the guesswork out of maintaining consistent angles. When looking at rolling setups, check that the magnetic support block offers multiple fixed angle faces, typically 15 degrees for thin slicing knives and 20 degrees for heavier utility blades. Make sure the roller itself accepts swappable abrasive discs so you can switch between coarse diamond grit and fine ceramic polishing surfaces.
Dual-grit whetstones remain the standard choice for anyone who owns premium Japanese steel, custom pocket knives, or outdoor blades with unusual shapes. When choosing a stone kit, check that it includes a coarse side around 400 to 1000 grit for repairing dull bevels and a fine side of 3000 grit or higher for honing. A sturdy rubber stone collar mounted inside a solid bamboo or wooden base is critical to keep the stone from sliding across wet counters during use.

- TAR Score9.2
TAR Score is a ranking system developed by TopAppliancesReviews.com. TAR score has no relationship or impact from any manufacturers or sales agent websites. Learn more
- BrandIntelitopia

- TAR Score9.2
TAR Score is a ranking system developed by TopAppliancesReviews.com. TAR score has no relationship or impact from any manufacturers or sales agent websites. Learn more
- BrandFox Chapel Publishing

- TAR Score9.0
TAR Score is a ranking system developed by TopAppliancesReviews.com. TAR score has no relationship or impact from any manufacturers or sales agent websites. Learn more
- BrandKITCHELLENCE

- TAR Score9.0
TAR Score is a ranking system developed by TopAppliancesReviews.com. TAR score has no relationship or impact from any manufacturers or sales agent websites. Learn more
- BrandPOLISHSURF
- TAR Score9.0
TAR Score is a ranking system developed by TopAppliancesReviews.com. TAR score has no relationship or impact from any manufacturers or sales agent websites. Learn more
- BrandMIDO Professional Abrasive

- TAR Score8.8
TAR Score is a ranking system developed by TopAppliancesReviews.com. TAR score has no relationship or impact from any manufacturers or sales agent websites. Learn more
- BrandRAZORSHARP

- TAR Score8.8
TAR Score is a ranking system developed by TopAppliancesReviews.com. TAR score has no relationship or impact from any manufacturers or sales agent websites. Learn more
- BrandTUMBLER

- TAR Score8.0
TAR Score is a ranking system developed by TopAppliancesReviews.com. TAR score has no relationship or impact from any manufacturers or sales agent websites. Learn more
- BrandSHARPAL

- TAR Score8.0
TAR Score is a ranking system developed by TopAppliancesReviews.com. TAR score has no relationship or impact from any manufacturers or sales agent websites. Learn more
- BrandXARILK
Last update on 2026-10-19 / Affiliate links / Images, Product Titles, and Product Highlights from Amazon Product Advertising API
FAQs
How often should you sharpen a kitchen knife?
Most home cooks only need to use a sharpening tool every three to six months, depending on how often they cook. Using a honing steel between sharpenings realigns the edge and stretches out the time between metal-removing sessions. If your knife begins crushing soft tomatoes or sliding off onion skins instead of biting cleanly into them, it is time to bring out your sharpener.
What is the difference between sharpening and honing?
Honing uses a smooth or grooved metal rod to push a bent, curled edge back into a straight line without grinding away blade metal. Sharpening uses an abrasive stone, diamond wheel, or carbide slot to shave away dull steel and grind an entirely new cutting edge onto the knife. Honing keeps an edge running true between sharpenings, while sharpening restores a knife that has become blunt.
Can you use a standard knife sharpener on a serrated bread knife?
Standard pull-through sharpeners and flat whetstones should not be used on serrated bread knives because their flat abrasives only grind down the pointed teeth and ruin the scalloped shapes. Serrated knives require a tapered ceramic or diamond sharpening rod that fits inside each individual gullet between the teeth. You sharpen each curved dip one at a time from the beveled side.
Why does my knife feel dull right after I sharpen it?
A knife that feels dull immediately after sharpening usually has a rolled wire burr still clinging to the cutting edge, or the blade was held at an uneven angle that rounded off the apex. If you skip the fine polishing stage, the thin microscopic metal ridge folds over sideways during your first cut, making the blade feel blunt. Making a few light, alternating passes on a fine ceramic slot or high-grit whetstone wipes that burr away and exposes the true edge.


Top Rated Best Quality Range Hoods: 2026 Expert Picks

The 12 Best Small Solar Generators 2026

10 Best Quality Semi Automatic Washing Machine of 2026 For Leak-Free Laundry

11 Best Small Washer Machine of 2026 For Everyday Laundry

12 Best Vibration Pads For Washing Machine of 2026 To Stop Walking and Shaking

11 Best Selling Front Load Washing Machine of 2026 For Quiet Odor-Free Laundry

11 Best Washing Machine For King Size Bedding of 2026 To Prevent Cycle Errors

10 Best Small Front Loader Washing Machine of 2026 For Tight Closets






