
How to Use a Hori Hori Knife Safely

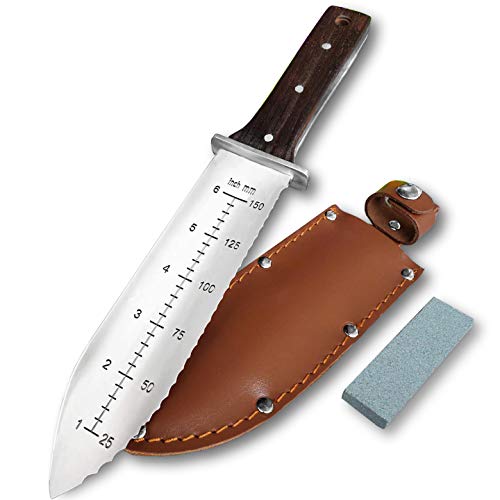
Holding a double-edged garden tool can feel intimidating, but working with it is completely safe once basic hand placement becomes second nature. Keep fingers tucked behind the handle guard, push the scooped blade into dirt at an angle, and lever weeds out from the root. Use the saw-toothed edge to cut woody roots, slice tough turf with the straight edge, and read the stamped lines to measure exact planting depth.
Your technique shifts slightly based on the chore and the ground beneath your boots. Loose garden beds allow the blade to slide right in, but dry clay calls for a gentle rocking motion instead of heavy prying that could bend the metal. Built-in features matter as well, especially whether the handle includes a raised lip to block wet fingers from sliding forward onto sharp edges. Here is how to work every side of the tool with confidence.
Understanding the Blade Anatomy and Safe Hand Placement
A hori hori knife blends the digging power of a trowel, the slicing utility of a knife, and the sawing action of a root cutter into one tool. Originating in Japan for mountain foraging, its design looks unusual at first, but every curve serves a clear purpose in the garden.
The core of the tool is its concave blade, which is the curved, scoop-shaped metal running down the center. This dished shape holds loose soil and compost like a narrow garden trowel while giving the metal the rigidity needed to plunge into compacted dirt. One side features a smooth, straight edge for slicing turf, cutting open bags of mulch, dividing tender roots, and trimming twine.
The opposite side features a serrated edge, which is the saw-toothed side of the blade. These teeth saw through woody roots and tough weed crowns that stop smooth blades cold. Etched depth markings stamped into the dished face in inches and millimeters let you measure planting depths directly in the hole.
Because you push this double-edged blade straight down into soil where rocks hide, hand placement is critical. Pushing hard against hidden obstacles can cause your hand to slip forward onto the sharp edges. Protect your hands by following these core grip rules:
- Wear heavy garden gloves: Use leather or cut-resistant gloves to cushion your grip and guard your skin against slips and thorns.
- Keep behind the guard: Seat your hand firmly behind the finger guard or flared bolster, never resting your thumb along the blade spine.
- Wrap your fingers fully: Close all four fingers and your thumb completely around the handle for steady control if the tip hits a rock.
- Push away from your body: Drive the blade downward and slightly forward, keeping your knees, legs, and free hand safely out of the blade path.
Digging Deep Taproots and Sawing Woody Growth
Weeds like dandelions, dock, and thistles survive by growing a taproot, which is the long center root of a weed that anchors deep into the earth. Snapping this root near the surface leaves the plant alive to regrow within days. Standard trowels are often too wide to reach the bottom without digging a massive hole, but a hori hori knife cuts straight down along the root channel with minimal mess.
Soil conditions change how much force you need. In loose garden beds, the blade glides in easily. In hard-packed, dry clay, driving the blade down with brute force strains your wrist and risks bending the metal. Moisten tough clay soil an hour before weeding to soften the ground.
To lift deep taproots cleanly without damaging the knife, use these steps:
- Clear away loose surface mulch so you can see where the weed stem enters the dirt.
- Place the tip of the knife one to two inches from the weed base, angling the scooped face toward the plant.
- Drive the blade into the soil at a 45-degree angle, aiming directly beneath the weed crown.
- Push the handle downward toward the dirt, using the blade curve as a lever to lift the root.
- Grasp the weed foliage with your gloved hand and pull smoothly while the blade levers the root from below.
When dividing overgrown perennials like hostas, daylilies, or ornamental grasses, turn the blade to the serrated edge. Lift the clump from the ground, set it on a tarp, and position the saw teeth in the cleft between two healthy crowns. Use steady back-and-forth sawing strokes to sever tough fibers rather than chopping down. Once severed, separate the root balls by hand and replant them promptly.
Planting Bulbs Accurately and Working with Soil
Planting spring bulbs like tulips and daffodils requires exact depths. Burying a bulb too shallow leaves it vulnerable to frost heave and rodents, while burying it too deep drains its energy before it breaks through the soil. The stamped ruler on the concave blade removes the guesswork entirely.
To plant bulbs quickly without excavating wide holes, follow these steps:
- Check the bulb package for the required planting depth, measured from the base of the bulb to the soil surface.
- Hold the knife vertically and push the blade into the dirt until the etched depth line matches your target number.
- Pull the handle toward your body two to three inches to lever open a clean pocket in the soil.
- Drop the bulb into the pocket behind the blade, keeping the flat root end down and the pointed sprout tip up.
- Slide the blade straight up out of the dirt, letting the soil collapse over the bulb, and press the surface firmly to remove air pockets.
The scoop shape also excels at transplanting seedlings. The curved blade acts like a narrow trowel, sliding down the side of nursery pots to lift root balls out without tearing delicate roots. In crowded garden beds, you can carve out an exact planting hole without disturbing neighboring plants.
For lawn edging, the smooth straight edge slices through grass runners and turf along garden borders. Drag the sharp edge along your bed line to establish clean edges, or use the pointed tip to slice open heavy bags of soil, compost, and mulch in one smooth motion.
Common Mistakes That Ruin the Blade and Daily Care
The most common mistake is using a garden knife as a demolition pry bar. The steel is engineered to slice roots, scoop soil, and lever out weeds, but it cannot replace a heavy steel crowbar. Prying against large buried boulders, concrete chunks, or thick tree stumps will bend the blade or snap the handle. If you feel the blade flex, stop immediately and loosen the obstruction with a garden fork.
Another damaging habit is twisting the blade sideways while buried in hard dirt. Steel withstands tremendous pressure when levered forward and backward along its natural curve. Twisting sideways forces stress onto the handle joint and can crack the grip or loosen the rivets. Always keep your prying motions aligned with the blade length.
Dirt holds moisture, mineral salts, and acidic sap, all of which attack bare steel. Leaving your knife coated in wet mud inside a humid shed leads to pitting and surface rust. Follow these simple steps after every garden session:
- Rinse away dirt: Wash the blade clean under a garden hose or outdoor spigot, brushing away clinging mud with a stiff brush.
- Dry thoroughly: Wipe the blade dry with a clean cotton rag right after rinsing.
- Apply protective oil: Rub a few drops of mineral oil or camellia oil across the steel to seal the metal against moisture.
- Store in a dry sheath: Place the clean, oiled knife inside its sheath and hang it on a peg in a dry shed.
Much like maintaining fine kitchen cutlery, such as German high carbon steel knife sets, keeping garden blades clean and moisture-free stops pitting before it starts. While garden knives do not require the razor-fine 15-degree edge found on Japanese chef knife sets, sharpening the straight edge once a season with a medium-grit whetstone makes cutting roots far easier. Keep the teeth clear of dried dirt so they can saw efficiently.
What to Look for in a Quality Garden Knife
Choosing a dependable garden knife comes down to selecting structural features that prevent blade breakage and protect your hands during tough chores. The most critical detail to verify is full tang construction. A full tang means one solid piece of blade steel extending all the way through the handle, secured with sturdy rivets. Cheaper models often use a partial tang, where a narrow metal rod is glued into a hollow grip. Partial tangs can snap or pull free when you apply leverage against stubborn roots.
Handle design is equally important for safety. Look for a knife with an integrated finger guard or a flared bolster between the handle and the blade. This raised barrier stops your hand from sliding forward onto the double-edged steel when you drive the tool into hard dirt. Handles made from contoured hardwood or textured, non-slip rubber provide a secure grip even when working in damp soil with wet gloves.
Consider how much blade maintenance you prefer. Rust-resistant stainless steel blades wash clean easily and require minimal oiling, making them ideal for everyday gardening in damp climates. High-carbon steel blades offer exceptional hardness and hold an edge longer against abrasive dirt, but they demand prompt drying and regular oiling to prevent rust spots. Check that depth markings are stamped or etched deeply into the metal so they do not rub off over time. Finally, ensure the tool includes a durable leather or heavy synthetic sheath with a secure belt loop so you can carry the blade safely while walking around your yard.

- TAR Score9.6
TAR Score is a ranking system developed by TopAppliancesReviews.com. TAR score has no relationship or impact from any manufacturers or sales agent websites. Learn more
- BrandPERWIN

- TAR Score9.6
TAR Score is a ranking system developed by TopAppliancesReviews.com. TAR score has no relationship or impact from any manufacturers or sales agent websites. Learn more
- BrandNisaku

- TAR Score9.6
TAR Score is a ranking system developed by TopAppliancesReviews.com. TAR score has no relationship or impact from any manufacturers or sales agent websites. Learn more
- BrandWORKPRO

- TAR Score9.6
TAR Score is a ranking system developed by TopAppliancesReviews.com. TAR score has no relationship or impact from any manufacturers or sales agent websites. Learn more
- BrandROYTOA
- TAR Score9.4
TAR Score is a ranking system developed by TopAppliancesReviews.com. TAR score has no relationship or impact from any manufacturers or sales agent websites. Learn more
- Brandgonicc

- TAR Score9.4
TAR Score is a ranking system developed by TopAppliancesReviews.com. TAR score has no relationship or impact from any manufacturers or sales agent websites. Learn more
- BrandTopline

- TAR Score9.2
TAR Score is a ranking system developed by TopAppliancesReviews.com. TAR score has no relationship or impact from any manufacturers or sales agent websites. Learn more
- BrandFiskars
Last update on 2026-10-21 / Affiliate links / Images, Product Titles, and Product Highlights from Amazon Product Advertising API
FAQs
How do you sharpen the saw-toothed edge of a hori hori knife?
Sharpen the serrated edge using a small, round sharpening rod or a tapered diamond file rather than a flat sharpening stone. Place the file inside each tooth groove on the beveled side of the blade and push forward with light, even pressure at the original angle. Avoid grinding the flat back side of the blade, which only needs a quick wipe to remove any burr, which is the microscopic wire edge of metal that forms during sharpening.
Can left-handed gardeners use a standard hori hori knife?
Left-handed gardeners can use a standard knife for digging, scooping dirt, and planting bulbs without issue. However, standard models place the serrated edge on the left side and the smooth edge on the right, which can make pulling cuts feel backward for a left-handed user. If you plan to do extensive root sawing or turf slicing, look for a left-handed model that mirrors the edge placement for natural hand movement.
What is the easiest way to remove surface rust from the blade?
Scrub light surface rust using a pad of fine steel wool or a nylon scouring pad lubricated with a few drops of mineral oil. For heavier rust spots, soak the blade in ordinary white household vinegar for thirty minutes to dissolve the oxidation, then scrub the metal clean. Rinse the blade thoroughly with fresh water, dry it immediately with a towel, and coat the clean steel with mineral oil to prevent rust from returning.


Top Rated Best Quality Range Hoods: 2026 Expert Picks

The 12 Best Small Solar Generators 2026

10 Best Quality Semi Automatic Washing Machine of 2026 For Leak-Free Laundry

11 Best Small Washer Machine of 2026 For Everyday Laundry

12 Best Vibration Pads For Washing Machine of 2026 To Stop Walking and Shaking

11 Best Selling Front Load Washing Machine of 2026 For Quiet Odor-Free Laundry

11 Best Washing Machine For King Size Bedding of 2026 To Prevent Cycle Errors

10 Best Small Front Loader Washing Machine of 2026 For Tight Closets






