
How to Safely Sharpen a Knife with a Knife Sharpener

Most people assume that sharpening a dull kitchen blade requires heavy downward pressure and aggressive back-and-forth sawing. In reality, forceful grinding ruins the steel, while true sharpness comes from smooth backward pulls with light, even pressure. Resting the tool flat on the counter and drawing the blade from heel to tip reshapes the edge cleanly without gouging dips into the metal.
The exact approach depends on your blade and the sharpener on your counter. Severely blunt knives need a coarse slot to rebuild the edge, whereas blades that only feel slightly sluggish need just a few passes through a fine slot. Motorized electric slots also shave steel much faster than manual pull-through tools, and serrated bread knives require dedicated slots so you do not grind away the teeth. Here is how to guide your knife through every step safely.
Coarse slots fix dull metal while fine slots polish
Pull-through sharpeners and motorized kitchen sharpeners use distinct slots lined with abrasive materials. These abrasives come in different grit ratings, which simply measures how coarse or fine the grinding surface is. A coarse grit uses hard materials like diamond or tungsten carbide to grind away metal fast. A fine grit relies on smooth ceramic stones to align and polish the edge.
Knowing which slot to use first depends entirely on the state of your knife. If your knife cannot slice through an onion skin without sliding sideways, or if it crushes a bell pepper instead of biting in, the edge is blunt. The bevel, which is the slanted cutting edge that tapers down to the sharp point, has rounded over. You must start in the coarse slot. The coarse abrasive cuts away damaged metal to reset that angle.
If your knife still cuts reasonably well but catches slightly on soft produce, skip the coarse slot completely. Moving straight to the medium or fine ceramic slot preserves the life of your blade. Coarse grinding removes real metal from your knife every single time you use it. Running your knife through a coarse slot every week will grind away the profile of the blade within a year or two.
The primary goal of the coarse stage is forming a burr, which is the tiny rough metal lip that folds over the opposite side of the blade as metal gets stripped away. Once that burr exists along the entire length of the blade, the coarse slot has finished its job. The fine slot then knocks that microscopic wire away and polishes the edge to a clean, straight line.
Pull the blade smoothly from heel to tip
Using a countertop sharpener takes only a few minutes when you follow a steady sequence. Set up your workspace first so nothing slips while you work with an exposed edge.
- Anchor the sharpener on a flat surface. Place the sharpener on a clean, dry, level counter. If the base has rubber feet, ensure they grip the counter firmly without wobbling. Grip the handle of the sharpener firmly with your non-dominant hand, keeping your fingers tucked securely behind the protective guard.
- Seat the blade heel into the slot. Take your knife in your dominant hand. Lower the heel, which is the wide blade part near the handle, straight down into the V-shaped slot. Hold the blade perpendicular to the counter at a strict 90-degree angle so both sides of the bevel receive even contact.
- Pull the knife backward toward your body. Draw the knife backward in one smooth, unbroken motion. Follow the natural upward curve of the blade belly as you pull, lifting your wrist slightly near the end so the tip stays in direct contact with the abrasives. Never push the blade forward into the slot.
- Keep passes light and counted. For a very dull knife, make three to five smooth pulls through the coarse slot. Maintain a steady pace, taking roughly two to three seconds for an eight-inch chef knife. Listen to the sound of the metal: a consistent scraping tone means the blade is seated evenly.
- Switch to the fine slot to hone the edge. Move the knife to the fine ceramic slot. Pull the blade from heel to tip three to five times using even lighter pressure. This step smooths down the coarse scratches, removes remaining metal burrs, and centers the cutting edge.
- Clean off metal shavings. Wipe the entire blade with a damp kitchen cloth from the spine toward the edge, or wash it in warm soapy water and dry it immediately. Tiny metal dust particles always cling to the steel after sharpening, and you must wash them away before touching food.
Heavy pressure and sawing motions destroy knife edges
The most common mistake home cooks make with a pull-through sharpener is pushing down hard on the blade. You might assume that bearing down on the knife will sharpen it faster, but extra downward force actually ruins the edge. Heavy pressure jams the steel into the abrasive wheels or carbide blades. This creates uneven notches, strips off excessive metal, and can cause deep gouges along the cutting line. Let the weight of the knife and the abrasive surface do the cutting work. Your hand should only guide the blade smoothly backward.
Another damaging habit is sawing the knife back and forth. Countertop sharpeners are engineered strictly for one-direction movement. When you push the knife forward after pulling it back, the blade catches against the abrasive teeth at an unnatural angle. This bends the delicate edge, chips brittle steel, and creates tiny flat spots that will refuse to slice cleanly. Always lift the knife completely out of the slot at the end of a pull, reset the heel at the front of the slot, and pull back again.
Blade angle also matters. Tilting the knife to the left or right while pulling causes the sharpener to grind one side of the bevel steeper than the other. Keep your wrist locked straight. When working with durable German high-carbon steel knives, an off-center pull can roll the edge unevenly. Watch the gap between the knife spine and the sharpener frame to ensure the blade stays perfectly upright from the heel all the way to the tip.
Speed is another factor where cooks stumble. Rushing the blade through the slot in half a second makes the knife bounce over the abrasive wheels. That bouncing leaves wavy ridges along the steel. Take a slow, measured two or three seconds for every pull so the abrasive contacts every millimeter of the edge evenly.
Paper and ripe tomatoes prove your knife is ready
Never run your thumb along a blade to see if it feels sharp. A microscopic burr can trick your skin into thinking an edge is sharp when it is actually ragged, and an accidental slip can cause a serious cut. Instead, verify your cutting edge using simple kitchen materials that expose dull spots instantly.
- The hanging paper slice: Hold a standard sheet of copy paper by one top corner with your fingers, letting it hang vertically. Place the heel of your knife against the top edge of the paper and draw it downward and forward with gentle pressure. A truly sharp edge will glide through the paper with a quiet whisper, producing a crisp, clean slice without tearing or crumpling the paper. If the knife snags or rips the sheet, note where along the blade it caught. That spot needs another light pass through the fine slot.
- The tomato skin test: Set a ripe tomato flat on your cutting board. Rest the blade on top of the skin without pressing down at all. Gently draw the knife backward toward you, relying purely on the blade weight. A sharp edge pierces the slick skin immediately and cuts a clean sliver. If the knife slides across the skin or dents the fruit before cutting, the edge is still rounded and requires more refinement.
- The overhead light check: Stand under a bright kitchen light and look straight down at the sharp edge of the blade, with the cutting edge pointing upward toward your eyes. A sharp edge is microscopic and cannot reflect light, appearing as a dark, invisible line. If you see bright glints or shiny white lines along the edge, those are flat spots where the steel remains blunt.
Serrated edges and specialty blades need dedicated sharpening methods
Not every kitchen blade belongs in a standard V-slot sharpener. Standard pull-through sharpeners are built specifically for double-bevel straight edges, where both sides of the blade angle down symmetrically. Trying to force specialty knives through these slots can destroy their profiles beyond easy repair.
Bread knives and serrated steak knives feature individual curved teeth with recessed valleys called gullets. Pulling a serrated blade through a standard coarse V-notch grinds flat spots across the raised points while missing the scalloped valleys completely. This flattens the teeth into blunt studs and ruins the sawing action of the knife. If your sharpener has a specialized ceramic slot labeled for serrations, you may use it to polish the smooth back side of the blade. Otherwise, serrated edges must be sharpened tooth by tooth using a handheld ceramic sharpening rod.
Single-bevel knives, including traditional Japanese chef knives, have an edge ground flat on one side and angled on the other. Running a single-bevel knife through a standard 50-50 sharpener cuts an unwanted bevel into the flat side, ruining the knife balance and slicing geometry. Delicate Japanese cutlery also features harder, more brittle steel that can chip against aggressive carbide blades.
Kitchen scissors and shears also require caution. Shears have flat inner mating surfaces that must slide tightly against each other. If you run a scissor blade through a regular knife slot, you round off the inner shearing corner, and the scissors will bend food instead of cutting it. Only sharpen shears in designated scissor-sharpening slots that maintain their single-sided angle.
Multi-stage sharpeners keep kitchen blades slicing smoothly every day
If your knives consistently crush ingredients rather than slicing them, investing in a quality countertop sharpener saves time and keeps food prep safe. When choosing a sharpener for home cooking, look for models that offer distinct multi-stage abrasive slots. A two-stage or three-stage design gives you the flexibility to repair a nicked edge on coarse diamond wheels, reshape a blunt profile, and touch up working edges on fine ceramic stones.
Consider whether a manual pull-through unit or an electric motorized model fits your kitchen habits. Manual sharpeners are compact, store easily in a drawer, and give you complete physical control over stroke speed. Look for manual designs with broad, slip-resistant rubber bases that sit solidly on the counter, paired with sturdy handles that keep your stabilizing hand well away from the blade path.
Electric sharpeners take the guesswork out of stroke angle by using internal guide slots that hold the knife at a fixed angle, usually between 15 and 20 degrees. Motorized spinning wheels sharpen blades in seconds with minimal physical effort, which is helpful if you maintain a large collection of kitchen cutlery. Before buying any sharpener, check that its factory guide angles match the bevel profile of your knives, and confirm whether the unit includes specialized slots for serrated blades or kitchen shears.
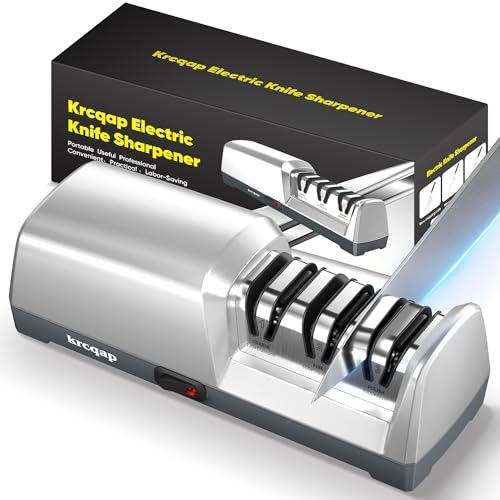
- TAR Score10.0
TAR Score is a ranking system developed by TopAppliancesReviews.com. TAR score has no relationship or impact from any manufacturers or sales agent websites. Learn more
- BrandKrcqap

- TAR Score9.4
TAR Score is a ranking system developed by TopAppliancesReviews.com. TAR score has no relationship or impact from any manufacturers or sales agent websites. Learn more
- BrandACCUSHARP

- TAR Score9.2
TAR Score is a ranking system developed by TopAppliancesReviews.com. TAR score has no relationship or impact from any manufacturers or sales agent websites. Learn more
- BrandIntelitopia

- TAR Score9.0
TAR Score is a ranking system developed by TopAppliancesReviews.com. TAR score has no relationship or impact from any manufacturers or sales agent websites. Learn more
- BrandKITCHELLENCE

- TAR Score9.0
TAR Score is a ranking system developed by TopAppliancesReviews.com. TAR score has no relationship or impact from any manufacturers or sales agent websites. Learn more
- BrandIndependently Published
- TAR Score8.8
TAR Score is a ranking system developed by TopAppliancesReviews.com. TAR score has no relationship or impact from any manufacturers or sales agent websites. Learn more
- BrandSharp Pebble

- TAR Score8.6
TAR Score is a ranking system developed by TopAppliancesReviews.com. TAR score has no relationship or impact from any manufacturers or sales agent websites. Learn more
- Brandlongzon

- TAR Score7.6
TAR Score is a ranking system developed by TopAppliancesReviews.com. TAR score has no relationship or impact from any manufacturers or sales agent websites. Learn more
- BrandAudible

- TAR Score7.0
TAR Score is a ranking system developed by TopAppliancesReviews.com. TAR score has no relationship or impact from any manufacturers or sales agent websites. Learn more
- BrandMajosta
Last update on 2026-10-03 / Affiliate links / Images, Product Titles, and Product Highlights from Amazon Product Advertising API


Top Rated Best Quality Range Hoods: 2026 Expert Picks

The 12 Best Small Solar Generators 2026

10 Best Quality Semi Automatic Washing Machine of 2026 For Leak-Free Laundry

11 Best Small Washer Machine of 2026 For Everyday Laundry

12 Best Vibration Pads For Washing Machine of 2026 To Stop Walking and Shaking

11 Best Selling Front Load Washing Machine of 2026 For Quiet Odor-Free Laundry

11 Best Washing Machine For King Size Bedding of 2026 To Prevent Cycle Errors

10 Best Small Front Loader Washing Machine of 2026 For Tight Closets






