
How to Sharpen a Pocket Knife With a Stone

Most folks assume that sharpening a blade on a stone is an elusive skill saved for master craftsmen. In reality, restoring a dull pocket knife only takes holding a steady 20-degree angle and slicing the edge smoothly from heel to tip. As long as the blade glides at that consistent slant, a tiny ridge of displaced steel forms on the opposite side to show the edge is resetting.
The exact process changes slightly based on the gear on your table. A traditional oil stone needs a few drops of lubricant to stay clear, water stones require a quick soak, and diamond plates can run dry. Nicked blades also need a coarse grit first, while a curved belly requires lifting the handle just a bit as you sweep. Learning the basic motion keeps your wrist locked so the blade stays clean, sharp, and scratch-free.
Match your stone type to water, oil, or dry use
Before steel touches stone, prepare the abrasive surface correctly. Different stones handle swarf (the fine metal shavings ground off the blade) in different ways. If you run dry blade steel across a dry water stone, metal dust packs into the pores, glazing the stone smooth and stopping it from cutting.
Follow this simple preparation checklist before starting your strokes:
- Water stones: Submerge aluminum oxide whetstones in clean water for 10 to 15 minutes. When air bubbles stop rising to the surface, the stone is saturated. Keep water nearby to splash the stone during sharpening so slurry floats away freely.
- Diamond stones: Diamond-coated metal plates require minimal prep. Run them dry, or add a few drops of water with a drop of dish soap to float swarf away. Never use oil on diamond plates, as oil gums up the diamond pattern and makes cleaning difficult.
- Oil stones: Natural Arkansas stones or synthetic silicon carbide blocks require a few drops of light mineral oil or honing oil to lift loose metal off the grit. Never use vegetable cooking oils or motor oil, which turn sticky and ruin the stone pores.
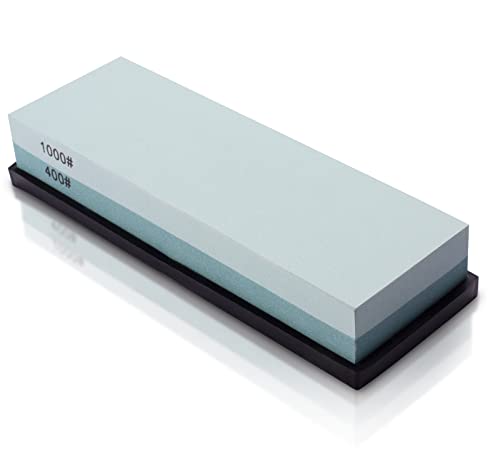
- Stable base setup: Place your stone on a flat counter. Use a rubber base, a silicone holder, or a damp folded kitchen towel underneath. A stone that slides while you push an open knife forward is dangerous.
Lock your wrist to hold a steady 20-degree angle
Holding a consistent angle is the foundation of sharpening. The bevel (the angled slope of the cutting edge) must meet evenly on both sides to form a crisp apex. Most everyday carry pocket knives feature a sturdy 20-degree utility edge per side. This angle balances clean slicing with enough steel thickness to cut cardboard, rope, plastic, and wood without chipping.
Steeper edges, such as the 15-degree bevels found on blades in high-carbon Japanese chef knife sets, are too delicate for utility tools. A 20-degree bevel provides the durability your pocket blade needs.
To find 20 degrees without an angle guide, use this simple trick:
- Stand the blade straight up on the stone at a 90-degree angle.
- Tilt the blade halfway down toward the stone to find 45 degrees.
- Tilt it halfway down again to reach roughly 22.5 degrees.
- Lower the spine (the thick back edge of the blade) just a hair closer to the stone.
That small gap puts your cutting edge right at 20 degrees. For a typical one-inch-wide pocket knife blade, this leaves a space under the spine roughly equal to the thickness of two stacked quarters.
The main reason edges get ruined is wrist rolling. As you push the blade across the stone, your hand naturally wants to dip or twist. That rolling motion changes your angle, rounding off the cutting apex and scratching the sides of the blade. Lock your wrist and fingers solid. Move your entire forearm from your elbow and shoulder instead.
Slice forward from blade heel to tip along the stone
Sharpening works best with an edge-leading stroke. Push the cutting edge forward across the stone as if shaving a paper-thin layer off the surface. Pushing into the stone creates a clean bevel and avoids creating an oversized wire edge.
Follow these steps for a clean forward slicing pass:
- Set the heel against the stone: Place the heel (the bottom edge near the handle) on the stone at your locked 20-degree angle. Point the blade diagonally across the stone surface.
- Position your hands: Grip the handle firmly with your dominant hand, keeping fingers clear of the folding pivot path. Place your other fingertips flat on the side of the blade near the edge to apply light, steady downward pressure.
- Push and sweep forward: Push the blade forward across the stone while drawing it sideways. The contact point should travel smoothly from heel to tip in a single continuous sweep.
- Lift slightly through the belly: When you reach the curved belly of the pocket knife, lift the handle slightly upward. This small lift keeps the curved section flat against the stone surface so the tip does not lift off and stay dull.
- Lift off and reset: Lift the blade completely off the stone at the end of the stroke. Do not drag the edge backward. Return the heel to the starting spot and repeat.
Apply moderate downward pressure, similar to pressing an eraser against paper. Make 10 to 15 steady passes on this first side before checking your progress.
Feel for a tiny wire burr before flipping sides
Never count strokes and flip the blade blindly. Only switch sides when physical evidence confirms that you removed enough metal. That evidence is the burr (the microscopic wire edge or curved sliver of metal that forms on the opposite side during sharpening).
As the stone grinds steel away along the bevel, the metal thins out at the cutting edge. Because steel is pliable, that paper-thin edge rolls over away from the stone, forming a tiny rough ridge. If you do not feel a burr, you have not ground all the way to the apex, and your knife will stay dull.
Check for the burr safely using your thumb:
- Never slide your thumb lengthwise down the sharp edge. That motion can cause serious cuts.
- Place your thumb pad flat on the side of the blade that faced away from the stone.
- Slide your thumb gently upward and outward, moving from the spine across the blade face and off the edge.
- Feel for friction: A formed burr feels like a rough, raised wire ridge catching your skin, similar to touching sandpaper or coarse stubble.
- Check the entire length: Check the heel, the curved belly, and the tip. If the burr is present at the heel but missing along the belly, make a few more slicing strokes on that curved section before flipping the knife over.
Work both sides evenly and polish on fine grit
Once you confirm a continuous burr along the entire edge, flip the blade to sharpen the opposite bevel. Working both sides evenly ensures the cutting edge sits centered along the blade spine.
Follow these steps to balance and polish your edge:
- Flip and match the angle: Place the unground side against the stone at the exact same 20-degree angle. Maintain a locked wrist and push the cutting edge forward across the stone.
- Grind until the burr flips: Make steady slicing strokes using the same moderate pressure. Stop every 5 to 8 passes to feel the opposite side. You are finished with this stage when the wire burr flips back to the original side.
- Remove the heavy burr: Make single, alternating passes on the stone. Do one forward stroke on the left side, flip the knife, and do one forward stroke on the right side. Complete 4 to 6 alternating strokes with very light pressure to break off the loose wire edge.
- Polish on finer grit: Move to a fine stone, such as a 1000-grit whetstone for a working utility edge, or a 3000 to 6000-grit stone for a polished finish. Complete 6 to 10 alternating, feather-light strokes per side to buff out scratches and align the edge.
- Clean and dry the blade: Wipe the knife with a clean rag to remove metal swarf and slurry. If your pocket knife uses high-carbon steel or tool steel like D2, wipe it dry immediately and apply a drop of mineral oil to prevent rust spots.
Slice clean paper to verify your new sharp edge
Never press your fingers directly against the edge apex to check for sharpness. A properly sharpened blade cuts skin before you feel pressure. Use simple, safe materials to confirm that your edge is keen and free of flat spots.
Run through this quick verification checklist:
- The standard paper slice check: Hold a sheet of printer paper loosely in the air by one corner. Place the heel of your pocket knife against the top edge of the paper at a 45-degree angle. Gently push the blade forward and downward. A sharp edge catches immediately and glides through the sheet with a clean hissing sound, leaving a smooth cut without tearing or snagging.
- Catch inspection on the curve: Pay close attention as the cut passes through the curved belly and tip. If the blade glides at first but suddenly snags or rips the paper near the tip, that spot still has a tiny burr or a dull patch. Return to your fine stone for two light passes on that exact section.
- Overhead light reflection check: Hold the blade directly under a bright lamp with the cutting edge pointed up toward your eyes. Look straight down along the rim. A dull spot, rolled edge, or chip reflects light as a bright white speck or line. A sharp apex is microscopic and reflects zero light, disappearing into the shadows.
- Shaving checks to avoid: Do not shave arm hair to check sharpness. Slicing through hanging paper confirms the edge cleanly without putting bare skin at risk.
Choose the right sharpening stone style for your daily carry
Keeping a pocket knife in reliable working condition requires choosing the right sharpening stone for your routine. You do not need a shop full of tools, but having the right balance of abrasive types and grit ratings makes regular blade maintenance straightforward.
Bench stones and portable field sharpeners serve different practical needs:
- Bench whetstones: These rectangular blocks sit flat on a workbench or kitchen table. Their wide surface gives you plenty of room to practice consistent 20-degree strokes without slipping off the edge. Many bench whetstones feature double-sided designs, combining a coarse grit to reshape dull bevels with a fine grit to polish the apex. When choosing a bench whetstone, look for a non-slip rubber base or a wooden holder so the stone stays stationary during forward strokes.
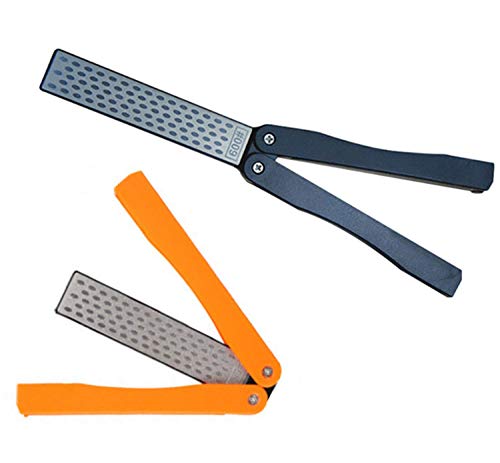
- Portable diamond and ceramic pocket stones: For camping, hunting, or job site tasks, a pocket-sized field sharpener is much easier to manage. Compact sharpeners feature diamond plates or ceramic slips built into folding handles or leather pouches. Diamond sharpeners cut quickly on hard blade steels and work dry or with a splash of water, letting you touch up an edge outdoors without soaking tubs or oil.
- What to confirm before buying: Verify that your setup provides at least two grit stages. You need a medium grit (around 400 to 1000) to grind away blunt metal and establish the bevel, paired with a fine grit (around 3000 to 6000 or ceramic) to remove the wire burr and polish the apex. Also check stone length; while compact stones fit in a pocket, a stone at least five inches long makes sweeping an entire blade from heel to tip much easier.

- TAR Score9.4
TAR Score is a ranking system developed by TopAppliancesReviews.com. TAR score has no relationship or impact from any manufacturers or sales agent websites. Learn more
- BrandBABOSTOW

- TAR Score9.2
TAR Score is a ranking system developed by TopAppliancesReviews.com. TAR score has no relationship or impact from any manufacturers or sales agent websites. Learn more
- BrandPatelai

- TAR Score9.2
TAR Score is a ranking system developed by TopAppliancesReviews.com. TAR score has no relationship or impact from any manufacturers or sales agent websites. Learn more
- BrandIntelitopia

- TAR Score9.2
TAR Score is a ranking system developed by TopAppliancesReviews.com. TAR score has no relationship or impact from any manufacturers or sales agent websites. Learn more
- Brandryerum
- TAR Score9.0
TAR Score is a ranking system developed by TopAppliancesReviews.com. TAR score has no relationship or impact from any manufacturers or sales agent websites. Learn more
- BrandMIDO Professional Abrasive

Angerstone Pocket Knife Sharpener Stone 1000/6000 Kit-Professional Whetstone Knife Sharpening
View on Amazon- TAR Score9.0
TAR Score is a ranking system developed by TopAppliancesReviews.com. TAR score has no relationship or impact from any manufacturers or sales agent websites. Learn more
- BrandAngerstone
- TAR Score8.8
TAR Score is a ranking system developed by TopAppliancesReviews.com. TAR score has no relationship or impact from any manufacturers or sales agent websites. Learn more
- BrandXILEWHZF

- TAR Score8.6
TAR Score is a ranking system developed by TopAppliancesReviews.com. TAR score has no relationship or impact from any manufacturers or sales agent websites. Learn more
- BrandHonoson

- TAR Score8.6
TAR Score is a ranking system developed by TopAppliancesReviews.com. TAR score has no relationship or impact from any manufacturers or sales agent websites. Learn more
- BrandGozantine
Last update on 2026-10-02 / Affiliate links / Images, Product Titles, and Product Highlights from Amazon Product Advertising API


Top Rated Best Quality Range Hoods: 2026 Expert Picks

The 12 Best Small Solar Generators 2026

10 Best Quality Semi Automatic Washing Machine of 2026 For Leak-Free Laundry

11 Best Small Washer Machine of 2026 For Everyday Laundry

12 Best Vibration Pads For Washing Machine of 2026 To Stop Walking and Shaking

11 Best Selling Front Load Washing Machine of 2026 For Quiet Odor-Free Laundry

11 Best Washing Machine For King Size Bedding of 2026 To Prevent Cycle Errors

10 Best Small Front Loader Washing Machine of 2026 For Tight Closets






