
How to Safely Sharpen a Knife with a Sharpening Stick

Rest the rod tip on a cutting board. Holding the stick straight up and down keeps it steady so the blade cannot slip toward your fingers. Tilt the knife at a gentle slant, roughly the thickness of a matchbook, and glide the edge from the heel (the wide base near the handle) down to the tip. Alternating light strokes down each side will realign a bent cutting edge in under two minutes.
The right approach depends on the stick and the blade in your hand. Standard steel rods only straighten curled metal, while rough ceramic rods actually shave off steel to sharpen. Slim Asian knives also need a slightly tighter tilt than thicker Western knives. If the edge is already completely rounded or chipped, this rod will not bring it back alone. Here is how to set your angle and work safely on the counter without risking your fingers.
Straightening Versus Grinding: How a Sharpening Stick Works
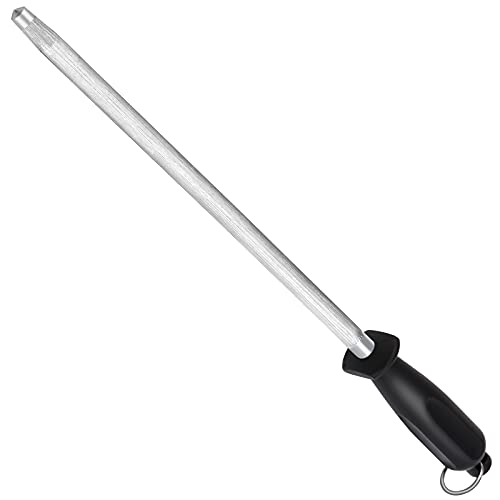
Most people call the long metal rod in a knife block a sharpening stick, but in kitchen terms, it is usually a honing steel. That name matters because a steel rod does not actually grind away metal to create a brand-new cutting edge. Instead, it acts as a metal straightening rod for an edge that is already there.
When you look closely at a sharp kitchen knife, the cutting edge is an extremely thin, microscopic triangle of steel. Every time that fine edge strikes an end-grain cutting board, slices through crusty bread, or hits a chicken bone, the thin tip of that triangle folds slightly to the left or right. The blade is not actually missing metal yet, but because the edge is bent sideways, it feels dull when you try to slice a soft tomato. The bent edge slides off the slick skin instead of biting straight through.
Running the blade down a metal straightening rod pushes that curled apex back into a straight line. The rod collects no metal shavings and leaves your blade thickness intact. This process fixes the burr, which is the microscopic wire edge or curved sliver of metal that forms along the cutting line during daily prep work. True sharpening, on the other hand, requires an abrasive surface like a whetstone or a diamond-coated rod to shave off steel and form a fresh slanted cutting edge, known as the bevel.
The type of knife you hold determines how that edge behaves. Traditional Western knives, such as those found in German high carbon steel knife sets, use slightly softer, tougher steel designed with a sturdy 20-degree utility edge on each side. These blades bend rather than chip, making them ideal candidates for a steel rod. Delicate Japanese cutlery, like blades found in high carbon Japanese chef knife sets, features much harder steel ground to a steep 15-degree slicing edge per side. Harder steel stays sharp longer on its own, but it can chip if struck roughly against a grooved steel rod, requiring gentle pressure or a smooth ceramic stick instead.
How to Sharpen a Knife on a Stick Step by Step
Television chefs often hold a steel stick up in mid-air, flicking the knife toward their hands at blinding speed. That flashy method looks impressive on camera, but it is the fastest way for a home cook to slip, slice open a knuckle, or ruin the angle of the blade. The safest, most consistent way to hone any kitchen knife is the tip-down method on your kitchen counter.
- Place a damp towel and your cutting board on the counter. Set a folded kitchen towel or damp paper towel flat on your countertop, then rest a wooden or plastic cutting board directly on top. Reason: The damp towel stops the cutting board from sliding across the counter while you work, giving you a completely stable foundation.
- Plant the tip of the sharpening stick straight down onto the board. Hold the rod completely vertical, with the protective tip pressed into the center of your cutting board and the handle pointed straight up at the ceiling. Reason: Anchoring the point prevents the steel from wobbling sideways and ensures the knife moves away from your body rather than toward your chest.
- Grip the handle firmly behind the safety guard. Wrap your non-dominant hand securely around the rod handle, making sure every finger and your thumb stay completely behind the broad protective guard. Reason: The hand guard acts as a physical shield to catch the blade if your stroke ever slips off the metal shaft.
- Lock in your blade angle against the top of the rod. Hold the knife in your dominant hand and place the heel, which is the base of the blade near the handle, against the top of the steel rod. To find a 20-degree angle, hold the blade perpendicular to the rod at a flat 90-degree corner, tilt it halfway down to 45 degrees, and then tilt it halfway once more toward the steel. Reason: Keeping the slanted cutting edge flat against the steel rod straightens the folded apex without grinding flat spots into the blade face.
- Glide the blade downward and pull it toward your body in one motion. Slide the knife down the rod while gently drawing the blade backward from heel to tip, using light and steady arm movement rather than flicking your wrist. Reason: Drawing the knife backward as it moves down guarantees that every inch of the blade, from the base to the curved belly, touches the steel evenly.
- End the stroke just before the knife tip touches the cutting board. Slow your motion as the very tip of the knife reaches the bottom of the steel rod, lifting the blade away before it strikes the wood below. Reason: Hitting the cutting board or counter with the delicate tip can snap the fine point or bend it out of shape.
- Switch to the opposite side of the rod and repeat the stroke. Place the other face of the blade against the opposite side of the steel rod at the same 15-to-20-degree angle, sweeping downward and pulling back from heel to tip. Reason: Alternating sides evenly centers the microscopic teeth along the edge rather than pushing the curled metal completely to one side.
- Wipe the blade clean with a soft kitchen towel. After finishing your passes, wipe the steel blade carefully from the spine down toward the edge using a dry cloth. Reason: Even a smooth honing rod can release tiny microscopic metal dust particles that you do not want ending up in your dinner ingredients.
Dialing in Pressure and Stroke Count
When using a metal straightening rod, more force does not produce a sharper edge. Heavy pressure actually works against you. Pressing hard against the steel rod flexes the thin cutting edge, distorting the bevel and causing the microscopic teeth to break off instead of standing upright. Think of the blade as resting on the surface of an overripe peach: you want enough contact to feel the steel glide, but never enough force to bruise the fruit underneath.
- Keep the knife light in your hand: Let the natural weight of the blade provide most of the downward pressure. Your hand only guides the path and maintains the angle.
- Stick to 4 to 6 passes per side: For regular kitchen upkeep, four to six alternating strokes on each side of the blade are plenty to push the rolled edge back into line.
- Always alternate sides: Never do five strokes on the left side followed by five strokes on the right. Doing multiple strokes on one side rolls the burr entirely in the opposite direction. Swap sides with every single pass to keep the edge centered.
- Prioritize smooth rhythm over speed: Take two full seconds per stroke. Rushing through the motion causes your hand to wobble, changing the angle from heel to tip and dulling the knife instead of fixing it.
- Check your work on a scrap piece of paper: Hold a loose sheet of printer paper vertically and slide your blade downward through the top edge. If it slices cleanly without catching or tearing the paper fibers, your edge is realigned and ready for prep.
When a Straightening Rod Stops Working
A metal straightening rod is a daily maintenance tool, not a cure for all cutting troubles. Over months of regular meal prep, the fine metal at the cutting edge does more than just bend sideways. Thin bits of metal eventually break away completely. The once-sharp triangular point rounds off into a blunt, smooth curve. When that happens, rubbing the blade against a standard steel rod will not help because there is no sharp apex left to stand back up.
You can tell your knife has reached this stage through a few simple signs. If you hold the blade directly under an overhead kitchen light and look straight down at the cutting edge, a sharp knife looks completely invisible. A worn-out edge catches the light and gleams back at you as a shiny, reflective line. That shine indicates a blunt flat spot where steel has worn away. Similarly, if your blade sports visible nicks, chips, or gouges from hitting bone or frozen foods, a steel rod cannot smooth those valleys out.
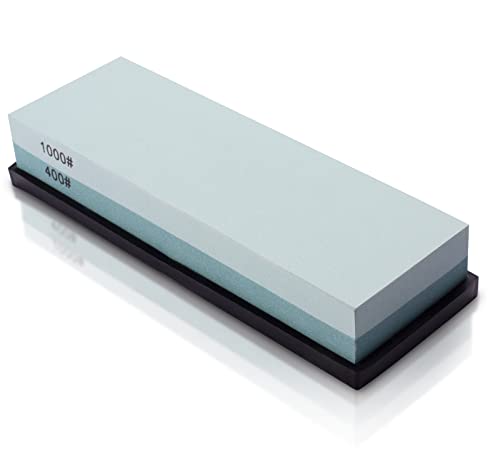
When the blade slides off an onion skin even after half a dozen passes on your rod, it is time to step up to an abrasive sharpening tool. A two-sided whetstone made of silicon carbide or white corundum removes old metal and cuts a brand-new bevel. You start on a coarse 400-grit surface to grind away flat spots and establish a crisp new shape, then flip to a fine 1000-grit water stone to polish the scratch marks into a mirror-like slicing edge. For cooks using specialized prep tools like those in hammered finish knife sets, pairing an abrasive stone for seasonal grinding with a smooth rod for weekly realigning keeps blades cutting effortlessly year after year.
What to Look for in Knife Maintenance Tools
If you want to keep your kitchen cutlery in top condition, choosing the right maintenance tools makes the job much easier. Not every sharpening stick performs the same task, and pairing the wrong tool with your knife steel can lead to frustrating results.
First, check the rod length against the largest knife in your kitchen. A maintenance stick should always be at least two inches longer than your longest blade. If you regularly use an 8-inch chef knife, pick a 10-inch or 12-inch rod. A rod that is too short forces you to stop your stroke halfway through, leaving the tip of your blade unworked and increasing the risk of the edge catching the handle.
Next, consider the rod material based on your knives:
- Smooth or lightly grooved steel rods: These are the classic choices for standard stainless steel and German knives. They realign folded edges quickly without stripping blade metal, making them perfect for frequent, everyday maintenance.
- Ceramic rods: Made from hard ceramic material, these sticks offer light abrasion. They gently polish the edge and shave off microscopic amounts of metal, making them great for hard Japanese blades that need a tiny touch of sharpening alongside realignment.
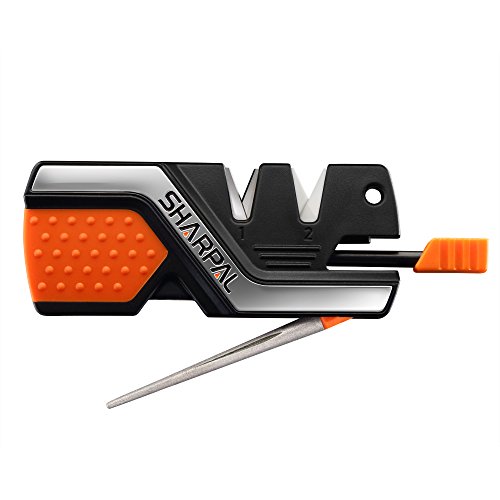
- Diamond-coated rods: These sticks feature fine diamond abrasive grit bonded to the shaft. They cut aggressively and remove metal with every pass, functioning more like a fast handheld file than a gentle straightening rod. Use them sparingly on severely neglected edges.
Finally, inspect the safety features of the handle. Look for an ergonomic grip made from durable, slip-resistant materials like molded polypropylene or textured hardwood. Most importantly, ensure the handle includes an ample, flared safety guard between your fingers and the steel shaft. A sturdy hand guard gives you peace of mind, allowing you to focus on steady strokes and clean angles without worrying about slips.

- TAR Score9.4
TAR Score is a ranking system developed by TopAppliancesReviews.com. TAR score has no relationship or impact from any manufacturers or sales agent websites. Learn more
- Brandwgsajlo

- TAR Score9.2
TAR Score is a ranking system developed by TopAppliancesReviews.com. TAR score has no relationship or impact from any manufacturers or sales agent websites. Learn more
- BrandHiramWare
- TAR Score9.0
TAR Score is a ranking system developed by TopAppliancesReviews.com. TAR score has no relationship or impact from any manufacturers or sales agent websites. Learn more
- BrandAcoWELL
- TAR Score9.0
TAR Score is a ranking system developed by TopAppliancesReviews.com. TAR score has no relationship or impact from any manufacturers or sales agent websites. Learn more
- BrandMIDO Professional Abrasive
- TAR Score9.0
TAR Score is a ranking system developed by TopAppliancesReviews.com. TAR score has no relationship or impact from any manufacturers or sales agent websites. Learn more
- BrandSHARPAL

- TAR Score8.8
TAR Score is a ranking system developed by TopAppliancesReviews.com. TAR score has no relationship or impact from any manufacturers or sales agent websites. Learn more
- BrandFANERFUN

- TAR Score8.6
TAR Score is a ranking system developed by TopAppliancesReviews.com. TAR score has no relationship or impact from any manufacturers or sales agent websites. Learn more
- BrandHonoson

- TAR Score8.6
TAR Score is a ranking system developed by TopAppliancesReviews.com. TAR score has no relationship or impact from any manufacturers or sales agent websites. Learn more
- Brandlongzon

- TAR Score8.6
TAR Score is a ranking system developed by TopAppliancesReviews.com. TAR score has no relationship or impact from any manufacturers or sales agent websites. Learn more
- BrandSHARPAL
Last update on 2026-10-02 / Affiliate links / Images, Product Titles, and Product Highlights from Amazon Product Advertising API
FAQs
How often should you use a sharpening stick on your kitchen knives?
Use your metal straightening rod once every two or three major cooking sessions, or whenever you notice the knife beginning to drag against food. Frequent, gentle realigning prevents the blade from rolling too far out of shape. Taking thirty seconds to hone before slicing meat or chopping firm vegetables keeps prep effortless.
Can using a sharpening stick ruin a good knife?
Using improper technique can dull your blade or scratch the sides, but it rarely ruins a knife permanently. The biggest mistake is holding the knife at too steep of an angle, which blunts the delicate cutting apex. Striking the rod with excessive force can also chip brittle steels, so always keep your pressure light and your movements slow.
Should you hone your knife before or after cutting?
Honing right before you start food prep is best because it guarantees a straight, clean edge right when you need it most. If you prefer to hone after cooking, always wash and dry your blade thoroughly before touching it to the rod. Running a greasy or wet knife down your steel will coat the rod in food residue and cause slipping.
What is the difference between a steel rod and a ceramic rod?
A steel rod simply pushes a folded cutting edge back into a straight line without taking off any metal. A ceramic rod is harder than kitchen steel and possesses mild abrasive grit, meaning it physically shaves away tiny amounts of steel to sharpen as it straightens. Ceramic rods work well on hard steel knives but can crack if dropped onto a tile floor.


Top Rated Best Quality Range Hoods: 2026 Expert Picks

The 12 Best Small Solar Generators 2026

10 Best Quality Semi Automatic Washing Machine of 2026 For Leak-Free Laundry

11 Best Small Washer Machine of 2026 For Everyday Laundry

12 Best Vibration Pads For Washing Machine of 2026 To Stop Walking and Shaking

11 Best Selling Front Load Washing Machine of 2026 For Quiet Odor-Free Laundry

11 Best Washing Machine For King Size Bedding of 2026 To Prevent Cycle Errors

10 Best Small Front Loader Washing Machine of 2026 For Tight Closets






