
How to Sharpen a Knife on a Whetstone Without Scratching It

Many cooks assume sharpening on a water stone requires years of professional training or an artist's touch. That belief is mistaken, because restoring a dull edge simply comes down to holding a consistent angle until a tiny rough lip of metal forms on the side. Smoothing away that little lip on a finer surface leaves the knife slicing cleanly through food again.
A few basic details change the exact routine. Thinner Japanese blades slice best at a slim fifteen degrees, while thicker Western knives need a twenty-degree angle. Heavily nicked steel requires a rough stone first, whereas everyday dull blades can start on medium grit (the stone's roughness rating). Some stones soak in water for ten minutes, while harder stones just need a quick splash. Here is how to steady your hands and sharpen cleanly without scratching the metal.
Soak Your Water Stone Until Air Bubbles Stop Rising
Preparing your sharpening stone properly protects both your blade and your workspace. Water stones need water to lubricate the steel and float away tiny metal shavings as you sharpen. If you run a dry knife across a dry stone, friction builds up heat quickly, clogging the stone pores and scratching the polished sides of your blade. Oil stones use petroleum-based honing oil, but standard water stones must only touch water. Pouring oil on a water stone ruins its pores permanently.
Submerge your stone completely in a wide container of cool tap water. Watch the surface of the stone as air escapes from inside the porous material. Streams of tiny bubbles will float to the top for several minutes. Keep the stone under water for 10 to 15 minutes until the bubbling stops entirely. Once no more bubbles rise, the stone is fully saturated and ready for work. Splash-and-go stones, which are denser ceramic blocks, do not need a deep soak and only require a generous splash of water on the surface before you start.
Before placing your knife on the wet stone, secure your sharpening station to prevent dangerous slips. A stone that slides across the counter while you push down with a sharp blade can cause deep cuts or ruin your blade angle. Use this quick checklist to stabilize your workspace:
- Place a damp towel flat on your countertop: Fold a cloth dish towel or paper towel flat beneath your stone setup to absorb drips and stop side-to-side sliding.
- Seat the stone in a non-slip silicone base: Most sharpening blocks include a fitted rubber shoe that wraps around the bottom edge to grip wet surfaces.
- Elevate the stone on a wooden block or bridge: Elevating the stone an inch or two above the counter gives your knuckles clearance so your fingers do not bang into the tabletop.
- Keep a small cup or spray bottle of water nearby: You will need to splash a few drops of water across the stone surface whenever the top starts to look dry during sharpening.
Match Your Blade Angle Using Simple Matchbook Finger Spacing
Holding a consistent angle is the single most important part of sharpening. Every knife edge has a bevel, which is the angled cutting edge ground into the steel. When you sharpen, you must lay that bevel completely flat against the stone. If you lift the blade spine too high, you grind away the apex and dull the edge. If you lay the knife too flat against the stone, the wide face of the blade rubs against the abrasive surface, leaving unsightly scratches across the finish.
Different knives require different bevel angles depending on their build and purpose. Thin, delicate blades found in Japanese chef knife sets work best with a steep 15-degree slicing edge per side. This narrow profile glides through vegetables with minimal resistance. Sturdier Western knives, such as thick European blades found in German high carbon steel knife sets, need a sturdy 20-degree utility edge per side. That wider bevel gives the edge more support when chopping through hard squash, joints, and dense root vegetables without chipping.
You can find your target angle without any fancy tools by using simple physical references. Hold the knife blade straight up and down on the stone at a 90-degree angle. Lean the blade halfway toward the stone to reach 45 degrees. Cut that angle in half again to find roughly 22 degrees. Lower the spine just a tiny fraction more, and you are sitting right at a 20-degree angle. For a 15-degree angle, slide two standard pennies under the spine of a typical kitchen chef knife. The height of two pennies matches the exact clearance you need to maintain between the stone and the knife spine.
Lock your wrists firmly once you find this position. Beginners often make the mistake of flicking or rocking their wrists as they move the blade across the stone. That rocking motion rounds the cutting edge into a blunt curve instead of creating a crisp apex. Instead of moving your hands from the wrist joints, lock your wrists in place and move your arms from your elbows and shoulders. Your upper body drives the stroke, keeping the angle steady from start to finish.
Work The Dull Edge Across The Coarse Grit Evenly
Sharpening begins on the coarse grit side of your stone. Grit refers to the roughness level of the stone. A low number, such as 400 to 1000 grit, indicates rough, aggressive particles that grind away damaged metal quickly to form a new edge. If your knife is dull, sliding off tomato skins, or showing small nicks, always begin on this rougher surface. Follow these numbered steps to work the first side of the blade safely:
- Position your grip securely: Hold the knife handle firmly with your dominant hand, wrapping your fingers underneath and resting your index finger along the spine for balance. Place two or three fingertips of your other hand flat on the face of the blade, just above the cutting edge, to guide downward pressure.
- Start at the blade heel: Place the heel of the knife (the back part of the cutting edge closest to the handle) across the far end of the stone at your chosen 15 or 20-degree angle. Point the edge away from your body.
- Sweep smoothly toward the tip: Draw the knife diagonally across the stone toward your body in a smooth, sweeping arc. Apply moderate, controlled downward pressure as you pull. As you reach the curved belly near the tip, lift your knife elbow and handle slightly to keep the curved tip flat against the abrasive surface.
- Reset without dragging hard: Lift the blade slightly or glide it back to the starting position with zero downward force. Sharpening happens on the active stroke, so avoid grinding heavily in reverse until you develop advanced control.
- Maintain moisture on the stone: As you work, water mixes with ground stone and steel dust to form a thin, muddy water paste on top called slurry. Do not wash this slurry off. The muddy paste acts as a cutting compound that helps grind the steel smoothly. Simply sprinkle a few drops of clean water over the surface if the stone feels sticky or dry.
Perform roughly 10 to 15 steady strokes along the first side. Do not rush to switch sides based on stroke count alone. Your goal on the coarse grit is not just counting repetitions, but creating a physical change in the metal that tells you the edge is fully formed.
Feel For The Burr To Know When To Flip
You should never guess whether a knife is ready to flip. The stone gives you a clear physical signal called a burr. A burr is a tiny rough lip of metal, also known as a microscopic wire edge, that curls over to the unsharpened side of the blade once the stone grinds the steel down to a true apex. If you stop sharpening before this metal lip forms, your knife will remain dull because the two sides of the cutting edge have not yet met in the middle.
Checking for the burr requires careful finger placement to avoid accidental cuts. Follow this safe method every time you inspect your blade:
- Stop your sharpening strokes: Rest the knife flat on your work surface or hold the handle firmly away from the stone.
- Wipe the flat side clean: Use a damp towel to wipe away the muddy slurry from the side of the blade that was facing away from the stone.
- Place your thumb pad on the blade face: Rest the soft pad of your thumb on the flat face of the steel, about a half-inch above the cutting edge.
- Slide gently across the edge: Move your thumb upward and outward, sliding off the edge from spine to blade apex. Never slide your thumb sideways along the cutting edge, which will slice into your skin instantly.
- Feel for friction or snags: If the burr is present, you will feel a distinct rough catch or wire-like ridge catching your skin along the entire length of the blade.
Inspect the edge from the heel all the way to the sharp tip. If you feel the rough lip at the heel and middle belly but the tip feels smooth, you have not ground enough steel at the tip. Return the knife to the stone and make a few extra focused passes across the tip section. Once you can feel that continuous rough lip from heel to point, you know the first side is finished. Flip the blade over and repeat the exact same process on the second side until the metal lip curls back in the opposite direction.
Smooth The Wire Edge On Fine Grit And Polish
Once you form a burr on both sides of the blade, the coarse shaping stage is complete. Now you must refine the scratch pattern and remove the weak metal wire. Fine grit stones, typically rated from 3000 to 6000 grit, feature tightly packed particles that polish the metal to a mirror shine and create a razor-sharp apex. Follow these steps to finish and deburr your knife:
- Rinse your blade and station thoroughly: Wash every trace of coarse grit and slurry off your knife blade and wipe down your stone holder. If coarse grit particles carry over to your fine stone, they will gouge the fine surface and leave deep scratches across your polished bevel.
- Flip to your fine grit stone: Place your soaked 3000 or 6000 grit stone into the non-slip rubber base and wet the surface with clean water.
- Sharpen with light, alternating strokes: Lay the knife on the stone at your established 15 or 20-degree angle. Apply only the weight of your hands without forcing the blade down. Make three to five smooth passes on one side, flip the knife, and make three to five passes on the opposite side. Alternating sides weakens the wire edge and centers the apex.
- Finish with edge-trailing polishing strokes: To cleanly strip away the last microscopic burr, make very light edge-trailing strokes. Pull the knife backward along the stone with the spine leading and the edge trailing behind, as if stroking a paintbrush across canvas. Make single alternating passes per side with almost no downward pressure.
- Rinse, dry, and inspect the blade: Hand-wash your knife with mild soap and warm water, then dry it immediately with a clean towel. Never drop a newly sharpened knife into a sink or leave it to air dry, especially if it contains carbon steel.
You can confirm the sharpness of your polished edge using everyday kitchen items. Hold a standard sheet of printer paper vertically by one corner and rest your knife edge against the top margin. A sharp blade will glide straight down through the paper with a clean, silent slice without snagging or tearing the fibers. You can also rest the blade on the smooth skin of a ripe tomato. With zero downward pressure, simply draw the knife backward; a sharp edge will bite into the skin instantly rather than crushing the soft fruit beneath it.
Avoid Wobbling Wrists And Heavy Downward Pressure
Sharpening on a stone is a mechanical skill that relies on muscle memory. When problems occur, they almost always stem from a few common physical habits that are easy to correct once you know what to look for. Use this checklist to keep your blade safe from accidental damage:
- Wobbling the blade angle during strokes: When your wrist rotates up and down as you push across the stone, you create a rounded, convex edge instead of a crisp bevel. Keep your wrist locked straight and let your torso and elbows carry the knife across the block.
- Bearing down with excessive muscle force: Pushing down too hard does not speed up the sharpening process. Heavy force flexes thin steel, causes the blade to slip off the edge of the stone, and can gouge deep grooves into soft water stones. Use about three to five pounds of downward pressure, roughly equal to pressing down firmly on a ripe grapefruit.
- Letting the stone run dry: Forgetting to splash water on the stone allows steel filings to load into the stone pores, causing the blade to skid unpredictably. Keep the surface glossy and wet at all times.
- Failing to lift the handle at the tip: Because kitchen knife tips curve upward toward the spine, keeping your knife completely flat will skip the tip entirely. Remember to raise your elbow and handle slightly as the curved belly rolls across the stone to keep the bevel in contact.
- Putting sharpened knives in the dishwasher: Harsh dishwasher detergents, high heat cycles, and clattering against metal racks will chip a fresh cutting edge instantly. Always hand-wash and dry blades immediately instead of soaking in sinks or running through dishwashers.
Choose Dual Grit Water Stones With Secure Rubber Bases
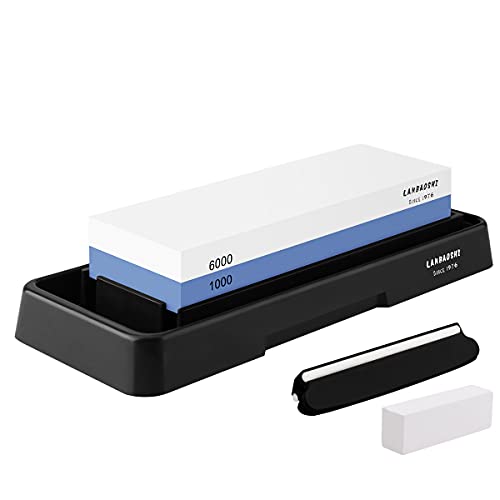
If you want to sharpen your kitchen knives at home without complicating your setup, a combination water stone is the most practical tool you can select. A dual-sided sharpening stone gives you two distinct roughness levels bonded together into a single solid block. The coarse or medium side, usually rated around 1000 grit, reshapes worn cutting edges and removes tiny micro-chips. The fine reverse side, rated between 3000 and 6000 grit, smooths away the rough wire burr and refines the apex into a clean slicing edge. Having both grits on one stone eliminates the need to buy and store separate blocks.
Before choosing a stone, check the base system that holds it in place. Sharpening requires steady, two-handed pressure, so the stone must never slide while you work. Look for models that include a snug-fitting silicone rubber boot that wraps around the stone, paired with a solid non-slip bamboo or composite base fitted with rubber feet. This design grips damp countertops securely, keeps the abrasive surface elevated for knuckle clearance, and catches runoff water to keep your counter clean.
Beginners who worry about scratching their knives should also look for sharpening stone sets that include a clip-on angle guide. This small plastic wedge snaps securely onto the spine of your knife. As you slide the blade across the stone, the guide rests gently against the wet surface, holding your blade at a consistent 15-degree angle automatically. Using a guide for your first few sharpening sessions trains your hands to recognize the proper height and spacing until holding the angle becomes second nature.
- TAR Score9.2
TAR Score is a ranking system developed by TopAppliancesReviews.com. TAR score has no relationship or impact from any manufacturers or sales agent websites. Learn more
- BrandLANBAOSHI

- TAR Score9.2
TAR Score is a ranking system developed by TopAppliancesReviews.com. TAR score has no relationship or impact from any manufacturers or sales agent websites. Learn more
- BrandAngerstone

- TAR Score9.2
TAR Score is a ranking system developed by TopAppliancesReviews.com. TAR score has no relationship or impact from any manufacturers or sales agent websites. Learn more
- BrandKEENBEST

- TAR Score9.2
TAR Score is a ranking system developed by TopAppliancesReviews.com. TAR score has no relationship or impact from any manufacturers or sales agent websites. Learn more
- BrandSharp Pebble

- TAR Score9.0
TAR Score is a ranking system developed by TopAppliancesReviews.com. TAR score has no relationship or impact from any manufacturers or sales agent websites. Learn more
- BrandHMPLL

- TAR Score9.0
TAR Score is a ranking system developed by TopAppliancesReviews.com. TAR score has no relationship or impact from any manufacturers or sales agent websites. Learn more
- BrandAngerstone

- TAR Score8.8
TAR Score is a ranking system developed by TopAppliancesReviews.com. TAR score has no relationship or impact from any manufacturers or sales agent websites. Learn more
- BrandFANERFUN

- TAR Score8.6
TAR Score is a ranking system developed by TopAppliancesReviews.com. TAR score has no relationship or impact from any manufacturers or sales agent websites. Learn more
- BrandHonoson

- TAR Score8.0
TAR Score is a ranking system developed by TopAppliancesReviews.com. TAR score has no relationship or impact from any manufacturers or sales agent websites. Learn more
- BrandSHARPAL
Last update on 2026-10-05 / Affiliate links / Images, Product Titles, and Product Highlights from Amazon Product Advertising API


Top Rated Best Quality Range Hoods: 2026 Expert Picks

The 12 Best Small Solar Generators 2026

10 Best Quality Semi Automatic Washing Machine of 2026 For Leak-Free Laundry

11 Best Small Washer Machine of 2026 For Everyday Laundry

12 Best Vibration Pads For Washing Machine of 2026 To Stop Walking and Shaking

11 Best Selling Front Load Washing Machine of 2026 For Quiet Odor-Free Laundry

11 Best Washing Machine For King Size Bedding of 2026 To Prevent Cycle Errors

10 Best Small Front Loader Washing Machine of 2026 For Tight Closets






