
How To Repair Washer Agitator That Won’t Move Fast

How To Repair Washer Agitator That Won’t Move starts with spotting the little warning signs most people brush aside. Clothes coming out soaking wet, strange grinding noises, or a washer tub that fills normally but barely swishes anything around can turn laundry day into a headache real quick. One minute the machine seems fine, then bam, towels stay dirty and detergent clumps stick to fabric like glue. That kind of problem usually points toward worn agitator dogs, stripped splines, a damaged drive block, or a loose coupling hiding underneath the surface.
Old washers rarely quit without throwing clues around first. A weak back-and-forth motion, sudden clicking sounds, or an agitator spinning freely by hand often means internal parts are worn down from years of heavy loads and overloaded cycles. Small issues snowball fast if they’re ignored, especially in busy homes where the washer barely gets a break. Tackling washer agitator repair early helps prevent bigger mechanical failures that can leave the entire machine useless.
Some repairs sound intimidating at first, but honestly, many agitator problems come down to basic parts and straightforward troubleshooting. A socket wrench, flat screwdriver, and a little patience can go a long way. Plenty of washers use simple plastic agitator cams or couplers that wear out naturally over time, especially after years of washing jeans, blankets, or oversized loads. Replacing those parts often restores the normal agitation cycle without tearing apart the whole appliance.
Noise matters too. Loud clunks, rattles, or humming sounds usually aren’t random. They often signal that the agitator mechanism struggles to grip properly during the wash cycle. Ignoring those sounds can place extra strain on the transmission or motor, and that’s where repair costs start climbing fast. Keeping an eye on washer performance helps avoid turning a manageable fix into an expensive appliance replacement.
Water movement inside the tub also tells a story. Weak circulation or clothes bunching into one side often means the agitator isn’t creating enough force to move fabrics evenly. That leads to detergent residue, uneven cleaning, and longer drying times afterward. A properly working agitator creates balanced movement that helps water and soap reach every piece of clothing more effectively.
Repair decisions usually depend on the washer’s age, condition, and the severity of the issue. Some older machines are absolutely worth fixing because replacement parts stay affordable and the mechanical systems remain easier to service compared to newer electronic-heavy models. On the flip side, cracked agitator assemblies or failing transmissions may require more careful consideration. Either way, understanding How To Repair Washer Agitator That Won’t Move gives homeowners more control before jumping straight into costly service calls.

- TAR Score10.0
TAR Score is a ranking system developed by TopAppliancesReviews.com. TAR score has no relationship or impact from any manufacturers or sales agent websites. Learn more
- BrandKXWXKXK

- TAR Score10.0
TAR Score is a ranking system developed by TopAppliancesReviews.com. TAR score has no relationship or impact from any manufacturers or sales agent websites. Learn more
- BrandSeentech
- TAR Score9.6
TAR Score is a ranking system developed by TopAppliancesReviews.com. TAR score has no relationship or impact from any manufacturers or sales agent websites. Learn more
- BrandSeentech

- TAR Score9.4
TAR Score is a ranking system developed by TopAppliancesReviews.com. TAR score has no relationship or impact from any manufacturers or sales agent websites. Learn more
- BrandPartsBroz

- TAR Score9.2
TAR Score is a ranking system developed by TopAppliancesReviews.com. TAR score has no relationship or impact from any manufacturers or sales agent websites. Learn more
- BrandSeentech

- TAR Score9.2
TAR Score is a ranking system developed by TopAppliancesReviews.com. TAR score has no relationship or impact from any manufacturers or sales agent websites. Learn more
- BrandAKEYSRC

- TAR Score9.0
TAR Score is a ranking system developed by TopAppliancesReviews.com. TAR score has no relationship or impact from any manufacturers or sales agent websites. Learn more
- BrandSupplying Demand
Last update on 2026-07-23 / Affiliate links / Images, Product Titles, and Product Highlights from Amazon Product Advertising API
How To Repair Washer Agitator That Won’t Move
A washer that fills, hums, drains, and still leaves clothes sitting there like a sad little island can make laundry feel personal. The machine looks alive, yet the load barely turns, detergent hangs around, and heavy towels come out smelling like they dodged the wash cycle. That’s where how to repair washer agitator that won’t move becomes less of a repair topic and more of a sanity saver. A stuck agitator usually points to worn drive parts, stripped agitator dogs, a loose bolt, or a deeper mechanical issue that needs a calm, step-by-step check.
Agitator Not Moving
The agitator’s job is simple, but it works harder than it gets credit for. It pulls clothes through soapy water, shifts fabric around the tub, and helps loosen dirt without relying only on soaking. Once that motion stops, cleaning power drops fast, even if the washer still fills and drains like nothing happened. That mismatch fools a lot of people because the machine sounds busy while the clothes barely move.
A common sign is a washer that runs through the wash cycle while the center post stays still. Sometimes the lower section moves but the upper section just sits there, which often points to bad agitator dogs inside a dual-action agitator. Other times the whole agitator spins freely by hand, almost like it lost its grip. That usually means the splines, coupler, or drive block deserve a closer look.
Heavy loads make the problem show up sooner. Thick blankets, jeans, towels, and overloaded baskets put extra strain on the agitator’s plastic and metal contact points. After enough cycles, those parts can wear smooth, crack, or stop catching the way they should. The washer may still make noise, but the real movement is gone, and that’s the part that matters.
There’s also a difference between a stuck agitator and a washer that won’t wash because the motor never engages. A dead motor, failed lid switch, or broken belt can look similar at first glance. The trick is to watch what actually happens during the wash cycle. If the tub fills and the motor sounds active but the agitator doesn’t grab, mechanical wear inside the agitator assembly is a smart place to begin.
Start With Safe Checks
Safety comes first, even for a repair that looks simple. Unplug the washer before touching the agitator, removing caps, or reaching near the tub. Water and electricity don’t play nice, and a sudden motor kick can turn a quick fix into a bad day. A steady repair starts with power disconnected, water stable, and the tub empty enough to work without wrestling wet laundry.
Pull the clothes out and check for anything jammed near the base of the agitator. Socks, drawstrings, bra wires, coins, and small cloth pieces can wedge into tight spots and block normal motion. A jam won’t always look dramatic, either. Sometimes a thin piece of fabric hides low around the agitator base and creates enough resistance to stop the wash action.
Try moving the agitator by hand after the washer is unplugged. A little resistance is normal, but a loose, floppy spin often signals stripped internal teeth or a worn coupler. No movement at all may mean something is jammed, seized, or stuck against the drive shaft. That quick hand test gives you a better starting point before you begin taking anything apart.
Listen to what the washer was doing before you unplugged it. Grinding can point toward worn plastic parts. Clicking often shows up when agitator dogs fail to catch. A low hum without movement may hint at a motor, belt, capacitor, or transmission issue, depending on the washer style.
Remove The Agitator Cap
The top cap is usually the doorway into the agitator assembly. Most models have a fabric softener dispenser or plastic cap sitting on top, and it usually lifts off by hand or with gentle pressure from a flat screwdriver. Go easy here because old plastic gets brittle, especially on washers that have lived through years of hot water cycles. Cracking the cap creates a fresh annoyance you didn’t ask for.
Once the cap is off, look for a dust cover or inner seal. This piece keeps detergent gunk, lint, and moisture away from the retaining bolt. If it’s sticky or coated with buildup, clean around it before going deeper. A cleaner work area makes it easier to spot rust, stripped parts, or loose hardware.
The center bolt usually holds the agitator to the drive shaft. A socket wrench with an extension often does the job, though sizes vary by brand and model. If the bolt feels frozen, don’t muscle it so hard that the plastic cracks. A little patience, steady pressure, and the right socket beat a rounded bolt head every time.
Set each part aside in order as it comes off. Caps, seals, bolts, washers, and cam pieces can look obvious in the moment, then suddenly become a puzzle ten minutes later. A quick phone photo before removing parts can save a lot of squinting later. That small habit protects the reassembly process and keeps the repair from turning into guesswork.
Check Agitator Dogs And Cam Parts
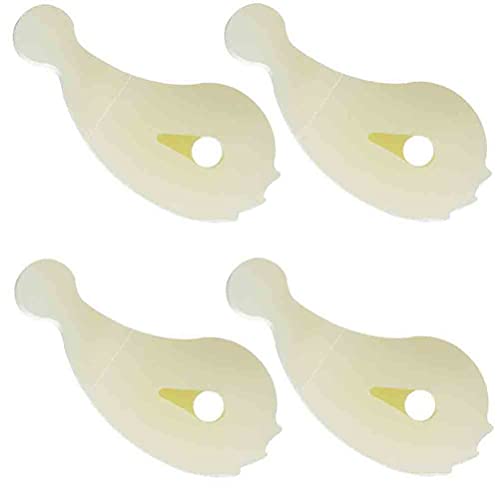
Dual-action agitators often rely on small plastic pieces called agitator dogs. These little pawl-like parts help the upper agitator grip in one direction and slip in the other. Once they wear down, the top half may stop pulling clothes through the water. The washer may still sound normal, but fabric rollover becomes weak or disappears.
Bad agitator dogs usually look rounded, shaved down, cracked, or slick where the teeth should catch. They’re small, cheap parts, yet they cause big headaches. A worn cam kit can create the same trouble because the dogs need a solid housing to sit and pivot correctly. Replacing the whole agitator repair kit often makes more sense than swapping only one tiny piece.
Pay attention to the direction of each part before pulling the cam apart. The dogs need to face the right way to grab properly during the wash motion. Installed backward, they won’t do their job, and the washer will act like nothing changed. That’s one of those mistakes that feels silly, but it happens all the time.
Grease usually isn’t needed on agitator dogs because they depend on grip, not slick movement. Greasing the wrong plastic teeth can make the agitator slip even more. For bearing-related washer noise or other rotating parts outside the agitator, compare repair prep with washing machine bearings grease before applying lubricant in the wrong place. The right product belongs in the right spot, and over-lubricating grip parts can backfire.
Inspect The Agitator Coupler
Many washers use an agitator coupler to connect the agitator to the drive shaft. This part often has ridges or splines that lock into the agitator and transfer movement from the machine below. Once those ridges wear flat, the motor may turn while the agitator sits there acting innocent. That’s a classic sign of lost mechanical grip.
After removing the agitator, check the coupler for cracks, missing teeth, or smooth areas where grooves should be sharp. A damaged coupler may also leave plastic dust or shavings around the shaft. That debris tells a story. Parts have been rubbing instead of locking together, and the agitator can’t move with enough force to wash properly.
A loose coupler can also create knocking or rattling during the wash cycle. The sound may get worse with bulky loads because the agitator needs more torque to move wet fabric. Replacing the coupler is usually straightforward, but the fit needs to be snug. A poor fit means the same slipping problem comes right back.
Washer design matters here. Portable or compact units may use different drive layouts, smaller agitators, or impeller-style wash plates instead of tall center agitators. To compare space-saving laundry setups before buying another machine, use best mobile washing machine as a separate reference point for small-space tradeoffs. A compact washer can be handy, but repair access and load limits deserve real attention.
Look For Stripped Splines
Splines are the ridges that help the agitator lock onto the drive shaft or coupler. They’re easy to overlook because they sit inside the agitator and don’t look exciting. Still, those ridges carry the force that moves the entire wash load. Once they strip out, the agitator may wobble, slip, or spin without moving clothes correctly.
Use a flashlight and inspect the inside of the agitator where it meets the shaft. Sharp ridges should look defined, not smooth or chewed up. A rounded interior means the agitator body itself may need replacement. Swapping dogs or bolts won’t fix a stripped agitator shell because the main gripping surface is already gone.
Stripped splines often show up after repeated overloading. Wet blankets and heavy towels create extra drag, and the agitator takes the punishment first. The washer may limp along for a while, but slipping gets worse over time. By the time clothes stop rolling through the water, the damage is usually visible inside the agitator base.
Also check the metal shaft for wear. A damaged shaft is a bigger deal than a damaged plastic agitator because it connects to deeper drive components. If the shaft splines are badly worn, replacing the agitator alone may not hold for long. That’s where repair cost, washer age, and machine condition all start to matter.
Test The Drive Belt Or Motor Coupling
Some washer agitator problems start below the tub, not inside the agitator itself. Belt-drive washers need a working belt to transfer motor power. Direct-drive models may use a motor coupling instead. If either part fails, the washer may fill and drain but struggle to agitate or spin.
A broken belt may leave a burnt rubber smell, loose rubber pieces, or no movement from both the agitator and spin cycle. A slipping belt can still move a little, then quit under load. That makes the washer act better when empty than when packed with wet clothes. This clue matters because load-based failure often points toward power transfer trouble.
Motor couplings can crack or break after years of stop-and-start stress. They’re designed to protect bigger parts from damage, so failure isn’t always a bad design flaw. It can be the machine’s way of sacrificing a smaller part instead of destroying the motor or transmission. Replacing a broken motor coupling can restore agitation if the rest of the drive system is healthy.
Don’t skip the lid switch or lid lock on top-load washers. Some machines won’t agitate unless the lid system confirms the lid is closed. A bad switch can mimic a drive failure because the washer refuses to engage movement. Testing that safety circuit helps separate electrical interruption from actual agitator damage.
Watch For Transmission Trouble
Transmission problems are less fun because they sit deeper inside the washer. The transmission helps convert motor power into the back-and-forth motion needed for agitation. If it fails, the agitator may stop moving even after the dogs, coupler, belt, and bolt all check out. That’s the point where a simple repair can start getting pricey.
Grinding, oil leaks, loud clunks, or a washer that won’t agitate or spin properly can point toward transmission trouble. Some machines may still drain, which makes the problem harder to read at first. A failing transmission can also create jerky movement before it quits completely. Those signs deserve attention because deep drive repairs take more time and money.
Age changes the decision. A newer washer with a solid tub, quiet bearings, and no control issues may justify a deeper repair. An older washer with rust, leaks, noisy bearings, and weak spin performance might not be worth chasing one problem after another. Repair value depends on the whole machine, not just the stuck agitator.
Air quality in a laundry area can also become part of the bigger home maintenance picture, especially in damp rooms where odors linger after wet loads sit too long. Separately, reduce stale-room smells during travel or small-space stays with travel air purifier if laundry humidity follows you into tight rooms. That’s not an agitator fix, but odor control becomes useful when washer problems leave damp fabric waiting around.
Reassemble Without Guesswork
Reassembly can feel easy until one tiny part faces the wrong direction. Keep the agitator cam, dogs, bolt, seal, and cap lined up in the same order they came out. A phone photo helps more than memory, especially after detergent buildup and old plastic parts start looking alike. Slow hands beat rushed hands here.
Seat the agitator firmly on the shaft before tightening the center bolt. The fit should feel snug, not crooked or forced. If the agitator rocks side to side after tightening, something isn’t sitting right. That wobble can chew through new splines or loosen the repair again after only a few loads.
Don’t overtighten the bolt just because the old agitator slipped. Too much force can crack the agitator base or damage plastic housing around the cam. Tighten it securely, then stop once it feels seated. The goal is firm connection, not a wrestling match with the washer.
Snap the dust cover and cap back into place after checking that the top section moves correctly by hand. A dual-action agitator should grip one way and slip the other. That one-way catch is a good sign that the agitator dogs are doing their job. If it spins freely both ways, open it back up before running a full load.
Run A Controlled Test Load
A test load tells the truth fast. Start with a small load of towels or basic clothing instead of tossing in blankets right away. Watch the washer during the wash cycle and look for actual rollover, where clothes move down, around, and back through the water. Good agitation should create steady fabric movement, not lazy floating.
Use a normal water level for the load size. Too much water can make weak agitation harder to spot, while too little water can overload the agitator and create misleading strain. The washer needs the right balance to show whether the repair holds. A clean test keeps the result fair.
Listen during the first few minutes. Clicking, grinding, or banging means something may still be loose, worn, or misaligned. A soft mechanical hum is normal, but harsh noise deserves attention before the problem spreads. Early noise after repair is your warning light.
Greasy work clothes can make agitation problems more obvious because soap needs strong water movement to lift residue from fabric. For laundry loads that deal with oil, shop grime, or kitchen grease, compare cleaning setups with washing machine greasy clothes before blaming detergent alone. Strong agitation, proper water temperature, and load size control all matter.
Fix Load Habits That Break Agitators
Overloading is the quiet agitator killer. A washer may handle a stuffed tub once or twice, but repeated heavy loads grind down plastic teeth, strain couplers, and stress the drive system. Clothes need room to move through the water. Packed fabric just drags against the agitator until something gives.
Bulky items deserve extra care. Comforters, rugs, thick jackets, and heavy towels can wrap around the center post and pull unevenly. That twisting force hits the agitator harder than a normal mixed load. Split bulky laundry into smaller batches to protect the drive parts.
Detergent habits matter too. Too much soap creates residue that can gum up caps, seals, and moving parts over time. Suds also cushion clothes, which can reduce effective agitation and leave fabric feeling slick. Using the right amount keeps the washer cleaner and helps wash action stay consistent.
Uneven loading also causes trouble. Heavy jeans on one side and light shirts on the other can make the agitator fight an awkward load. Balance the tub before starting the cycle, especially with older machines. A few seconds of sorting can prevent repeat repair problems.
Know When Repair Is Not Worth It
Some agitator repairs are cheap and satisfying. Replacing dogs, a cam kit, or a coupler can bring an older washer back to life without drama. But deeper problems change the math fast. A failing transmission, worn shaft, rusted tub, or repeated drive failure can make replacement planning more practical.
Washer age matters because one repair can expose the next weak link. A machine with a stuck agitator, loud bearings, poor draining, and rust around the lid may be asking for too much attention. Fixing one part won’t solve the whole pattern. That’s where honest repair judgment saves money.
Look at parts availability before tearing too deep. Some older washers have easy-to-find agitator kits, while others require hunting for discontinued parts. A repair that depends on rare pieces can drag out longer than expected. Simple access and available parts make DIY repair much more realistic.
Kitchen and laundry airflow may seem unrelated, but moisture and odors often travel through small homes. To keep nearby cooking fumes and damp laundry smells from piling up indoors, compare ventilation upgrades with under cabinet range hoods as a separate home comfort fix. Better airflow won’t repair an agitator, but odor control helps the whole space feel less stale.
Prevent The Same Failure Again
A repaired agitator needs better habits afterward. Keep loads loose enough for clothes to roll naturally through the water. Use the right cycle for bulky items, and don’t treat every wash like the machine owes you a favor. Small changes protect new agitator parts from wearing out too soon.
Clean the agitator area every so often. Detergent residue, lint, and softener buildup can collect under caps and around the base. That grime may not stop the washer overnight, but it can make future repairs messier. A cleaner assembly helps moving parts stay easier to inspect.
Pay attention after the repair. If the washer starts clicking again, catches weakly, or leaves clothes barely turned, don’t ignore it for months. Fresh symptoms usually mean a part slipped, wore unevenly, or wasn’t seated correctly. Catching that early protects the motor, belt, and drive system.
Keep expectations realistic with older machines. A new cam kit can restore agitation, but it won’t erase worn bearings, aging seals, or a tired transmission. Still, a careful repair can squeeze a lot more useful life from a washer that’s otherwise solid. That’s the real win with how to repair washer agitator that won’t move.


10 Best Quality Semi Automatic Washing Machine of 2026 For Leak-Free Laundry

11 Best Small Washer Machine of 2026 For Everyday Laundry

12 Best Vibration Pads For Washing Machine of 2026 To Stop Walking and Shaking

11 Best Selling Front Load Washing Machine of 2026 For Quiet Odor-Free Laundry

11 Best Washing Machine For King Size Bedding of 2026 To Prevent Cycle Errors

10 Best Small Front Loader Washing Machine of 2026 For Tight Closets

12 Best Side Load Washing Machine of 2026 For Low Vibration

11 Best Single Tub Washing Machine of 2026 For Apartments Without Hookups






