How to Make a Kydex Sheath for a Knife at Home

Heat the plastic sheet and press it. A custom sheath comes together by heating heat-moldable plastic until it turns flexible, wrapping it firmly around the knife inside a foam clamp, and setting metal eyelets along the open seam. Once cool, the material hardens into a rigid shell that hugs the exact shape of the knife.
Getting a clean result comes down to three basic details. Blade preparation matters most, since wrapping masking tape over the steel creates essential draw clearance so the cutting edge never jams or scratches. Even heat softens the sheet without scorching it, while firm clamp pressure locks in a crisp snap around the handle. Follow these straightforward steps to shape a secure, rattle-free sheath at your workbench.
Essential Tools and Materials for Making a Kydex Sheath
Building a custom sheath at your home workbench does not require industrial machinery. You can achieve clean, secure results using basic workshop gear and reliable heat sources. The core material is a thermoform sheet, which is a heat-moldable plastic that softens when warm and hardens into rigid plastic once cooled. For fixed-blade knives, standard sheets measuring 0.080 inch thick give you the ideal balance between toughness and flexibility.
Beside the plastic sheet, you need a way to press the warm material around the knife. A simple clamp press made from two plywood boards and dense closed-cell thermoform foam works best. Soft furniture foam will crush flat and will not press the plastic into the small curves of your knife.
Gather these basic items before you begin:
- Thermoform plastic sheet: A 0.080-inch thickness works best for utility knives.
- Heat source: A dedicated toaster oven or heat gun with temperature control.
- Foam press: Two slabs of dense foam held between flat boards.
- Clamping pressure: Heavy trigger clamps or a bench vise.
- Masking tape: Blue painter tape to create blade clearance.
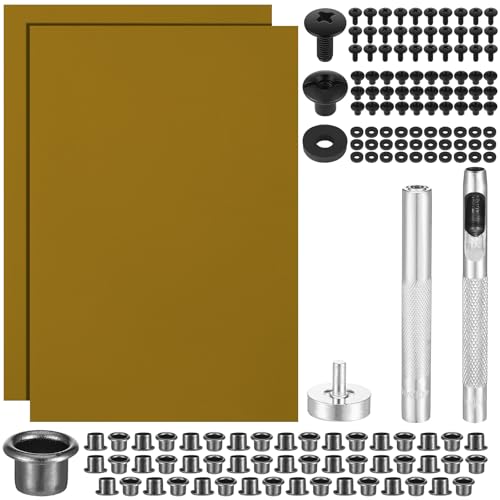
- Eyelets: Hollow metal rivets that secure the plastic layers.
- Eyelet hand setter: A punch and base die to flare the metal barrels.
- Drill and 1/4-inch bit: Sized to fit standard eyelet barrels.
- Finishing tools: A hand saw, plus 120-grit to 400-grit sandpaper for edges.
- Safety gear: Heat-resistant work gloves and eye protection.
Prepping the Knife to Prevent Scratches and Blade Jams
Heating and clamping hot plastic directly against bare steel is a common mistake. As heat-moldable plastic cools, it contracts slightly. If it shrinks directly over bare metal, the plastic hugs the cutting edge with intense friction. That leaves you with a knife that jams inside the sheath and collects deep scratches across the steel every time you draw it.
Applying blue painter tape prevents these problems by creating a thin buffer zone called draw clearance. Wrap two to three neat layers of tape along both sides of the blade, starting just below the spine down past the cutting edge. Keep the tape smooth with no wrinkles so the blade can slide freely without rubbing against the inner plastic walls.
Keep the handle guard and the choil completely free of tape. The choil is the small finger notch at the blade base. The sheath needs to grip this exact spot to create retention, which is the mechanical grip that locks the knife in place so it cannot fall out. If you cover the choil in tape, the sheath will feel loose and sloppy.
Blade steel care is also vital. If your knife features high-carbon or tool steel (such as D2), which is harder metal that stays sharp longer but requires dry wiping and light oiling to prevent rust spots, clean the blade completely dry before taping. Trapped humidity under tape can pit high-carbon steel during heating. While indoor kitchen cutlery, like German high-carbon steel premium knife block sets, rests safely on dry wooden blocks, outdoor blades need this tape barrier so their plastic shell stays clean and dry.
Step-by-Step Guide to Heating and Pressing Your Sheath
Heating the plastic correctly is the key to getting a tight, clean fit without scorching the material. Follow these steps in order to mold your sheath:
- Cut the plastic sheet with an extra inch of border. An extra margin gives you room for eyelets and keeps the hot sheet from slipping off the blade during clamping.
- Preheat your toaster oven to 320 degrees Fahrenheit. Keeping the heat between 300 and 350 degrees warms the plastic evenly without scorching the surface.
- Place the plastic sheet inside on a clean baking tray. Laying the sheet on parchment paper prevents it from sticking to bare oven racks as it softens.
- Warm the sheet for two to three minutes until limp. The plastic is ready when it drapes loosely like warm leather so it can capture every handle contour.
- Sandwich the hot sheet around your taped knife. Positioning the knife quickly while the plastic is soft ensures the material captures the shape of the finger guard before cooling.
- Place the package inside the foam press. Centering the knife between dense foam blocks ensures even pressure across both sides of the sheath.
- Clamp the press down tight with heavy-duty clamps. Applying firm, immediate clamping pressure forces the pliable plastic deep into the handle grooves and locking points.
- Leave the press clamped for ten to fifteen minutes. Allowing the plastic to cool completely down to room temperature sets its permanent shape and retention.
- Open the press and inspect the molded outline. Checking for a sharp, distinct mold line around the handle guard confirms that your sheath formed a solid mechanical lock.
Drilling, Setting Eyelets, and Smoothing the Edges
Once the plastic cools, you have a rough shell clamped around your knife. The next job is securing the sides and shaping the outer profile. Eyelets (hollow metal rivets) are the standard hardware for joining the two halves of heat-moldable plastic. They hold the sheath together and serve as mounting holes for belt attachments.
Mark your hole positions along the open side of the blade with a pencil. Keep each hole at least 1/4 inch away from the molded blade track so the drill bit does not nick the inner pocket. Belt attachments like metal clips or straps usually require hole spacing of 3/4 inch from center to center. Lay a ruler down to make sure your holes align with your planned belt hardware before you drill.
Drill the holes using a 1/4-inch drill bit at medium speed. Back the plastic with a scrap piece of wood so the bit does not tear the backside of the hole as it exits. Once drilled, blow away plastic chips and push an eyelet through each hole from front to back.
Place the sheath on a solid steel anvil or flat bench surface. Set the flared die of your eyelet hand setter tool over the open end of the rivet. Tap the setter with a mallet using straight, firm blows. Strike gently so you roll the metal lip evenly without splitting the metal. Check each rivet to confirm it sits flat against the plastic surface.
Trace your final sheath outline with a pencil and cut away excess plastic using a coping saw or rotary tool, leaving 1/4 inch of material outside the eyelets. Finish the rough edges by sanding with 120-grit sandpaper to remove saw marks, moving to 220-grit, and finishing with 400-grit wet-or-dry paper. Rub the edge with denim canvas for a smooth satin shine.
How to Adjust Sheath Retention and Fix Fit Issues
Proper retention means your knife snaps into the sheath with a firm click and stays put even if turned upside down, yet slides free smoothly when your thumb pushes against the sheath throat. Because molding plastic at home is a manual craft, your first fit might feel slightly too loose or aggressively tight.
You do not need to throw away the sheath and start over if the fit is off. Heat-moldable plastic can be reheated and adjusted multiple times without losing its strength. Use a heat gun on its low setting to make small spot adjustments.
- If the knife falls out or rattles: Point the heat gun at the sheath throat right where it grabs the choil or front handle scale. Warm the plastic for five to eight seconds until it yields under light finger pressure. Squeeze the opening inward slightly with gloved fingers. Hold it for thirty seconds until cool, then check the snap.
- If the knife requires two hands to pull out: The plastic is pinching too hard around the blade or guard. Warm the throat area briefly with the heat gun. Insert the knife and rock it slightly outward to open the mouth a fraction of a millimeter. Let it cool before checking the draw again.
- If the blade drags and scrapes: The body of the sheath is too narrow. Heat the flat sides of the sheath along the blade section while keeping heat away from the handle lock. Slide the taped knife inside to push the walls outward, and allow the plastic to reset.
Fine outdoor knives, whether they feature a full tang (one solid piece of blade steel extending all the way through the handle) or a partial tang (where the blade metal narrows or stops inside the handle), depend on this mechanical lock. While culinary blades like Japanese Damascus steel knives rely on soft wood sayas or countertop blocks to protect thin slicing bevels, outdoor knives need this rigid, dialed-in friction lock to keep you safe in the field.
Choosing the Right Materials and Sheath Making Kit
When selecting materials or an all-in-one DIY sheath making kit, look for components that match the scale of your blade. Check that the kit provides thermoform plastic sheets with a thickness around 0.080 inch. Thinner sheets can feel flimsy on heavy camp knives, while thicker sheets resist folding around tight corners.
Verify the type of molding foam included. The kit should provide high-density closed-cell foam that rebounds under heavy clamping pressure, rather than open-cell packing foam that crushes flat. Good foam ensures that the plastic sinks deeply into the handle contours during the press.
Check the hardware pack. Ensure the kit includes standard rolled-edge eyelets with a matching hand setter tool, along with mechanical screws, posts, and rubber washers. Rubber washers provide tension so your belt clip does not rattle loose over time.
Consider the knife you plan to carry. Fixed-blade knives with a full tang and an identifiable finger guard or handle choil are the easiest to fit with heat-moldable plastic. Blades with completely smooth, featureless handles offer fewer natural grip points, making retention harder to tune.

- TAR Score9.6
TAR Score is a ranking system developed by TopAppliancesReviews.com. TAR score has no relationship or impact from any manufacturers or sales agent websites. Learn more
- BrandHolsterSmith

- TAR Score9.0
TAR Score is a ranking system developed by TopAppliancesReviews.com. TAR score has no relationship or impact from any manufacturers or sales agent websites. Learn more
- BrandLanties

- TAR Score9.0
TAR Score is a ranking system developed by TopAppliancesReviews.com. TAR score has no relationship or impact from any manufacturers or sales agent websites. Learn more
- BrandRealeather

- TAR Score8.8
TAR Score is a ranking system developed by TopAppliancesReviews.com. TAR score has no relationship or impact from any manufacturers or sales agent websites. Learn more
- BrandTONIFE

- TAR Score8.6
TAR Score is a ranking system developed by TopAppliancesReviews.com. TAR score has no relationship or impact from any manufacturers or sales agent websites. Learn more
- BrandLanties
- TAR Score8.6
TAR Score is a ranking system developed by TopAppliancesReviews.com. TAR score has no relationship or impact from any manufacturers or sales agent websites. Learn more
- BrandLanties

- TAR Score8.0
TAR Score is a ranking system developed by TopAppliancesReviews.com. TAR score has no relationship or impact from any manufacturers or sales agent websites. Learn more
- BrandRoundFunny

- TAR Score6.2
TAR Score is a ranking system developed by TopAppliancesReviews.com. TAR score has no relationship or impact from any manufacturers or sales agent websites. Learn more
- BrandCREATESPACE
Last update on 2026-10-02 / Affiliate links / Images, Product Titles, and Product Highlights from Amazon Product Advertising API
FAQs
Can you heat thermoform plastic in a standard kitchen oven?
Yes, a standard kitchen oven or toaster oven works well for warming plastic sheets. Place the sheet on an ungreased baking tray lined with parchment paper or foil, and monitor the temperature with an oven thermometer. Keep the heat between 300 and 350 degrees Fahrenheit, and stay nearby so the plastic never scorches or smokes.
Will molding hot plastic around a knife ruin its temper?
The heat used to mold thermoform plastic does not get hot enough to harm hardened blade steel. Knife steel temper usually softens only when temperatures climb above 400 degrees Fahrenheit, whereas thermoform plastic softens below 350 degrees. Even so, keep open flames away from the edge, and never use a high-temperature torch to shape the plastic around the steel.
What is the difference between a taco sheath and a pancake sheath?
A taco sheath uses a single sheet of plastic folded over the spine of the knife, requiring eyelets along only one side. A pancake sheath uses two separate sheets pressed together, which requires eyelets down both sides of the blade. Taco sheaths are more compact for pocket or belt carry, while pancake sheaths offer greater mounting space for clips and pouches.
How do you clean dirt out of a finished plastic sheath?
You can rinse the sheath directly under warm running water with mild dish soap to wash away trail dirt and metal shavings. Unlike leather, thermoform plastic does not rot, mildew, or soften when wet. Shake out the water, dry the inside with a clean cloth, and let it air dry completely before returning your knife.

Top Rated Best Quality Range Hoods: 2026 Expert Picks
The 12 Best Small Solar Generators 2026

10 Best Quality Semi Automatic Washing Machine of 2026 For Leak-Free Laundry

11 Best Small Washer Machine of 2026 For Everyday Laundry

12 Best Vibration Pads For Washing Machine of 2026 To Stop Walking and Shaking

11 Best Selling Front Load Washing Machine of 2026 For Quiet Odor-Free Laundry

11 Best Washing Machine For King Size Bedding of 2026 To Prevent Cycle Errors

10 Best Small Front Loader Washing Machine of 2026 For Tight Closets