How to Make a Safe Knife Holder with Basic Tools

A loud clatter rings out every time a hand reaches into a crowded kitchen drawer searching for a paring blade. The easiest build is a magnetic hardwood wall strip made by drilling shallow pockets into the back of a board to hide strong rare-earth magnets. If wall space is tight, crafting a slotted wood tray insert keeps blades organized flat inside a drawer so sharp edges never bump together.
The right method depends on where the knives belong, how heavy the blades are, and what tools rest in the garage. Heavy chef knives require thinner wood backing and stronger magnets so steel never slips loose. In-drawer trays only call for simple hand cuts and basic wood glue. Here is how to choose the right design, work the materials safely, and build a dependable knife holder.
Pick the Right Storage Style for Your Kitchen Layout
Before you cut any wood, decide where your knives belong. Every kitchen has different wall space, drawer availability, and safety risks. Storing kitchen knives loose in a utensil drawer ruins fine cutting edges and creates an immediate cut hazard whenever you reach for a tool. Choosing the right holder design keeps sharp edges protected and keeps your fingers safe.
A magnetic wall strip is the most popular build for small kitchens. It lifts your collection up off the counter and out of crowded drawers, turning blank wall space into clean storage. Because the blades stick to the wood face, you can grab any knife instantly without hunting. But a wall strip requires drilling into drywall or tile, and it may put blades within reach if you have young children climbing on counters.
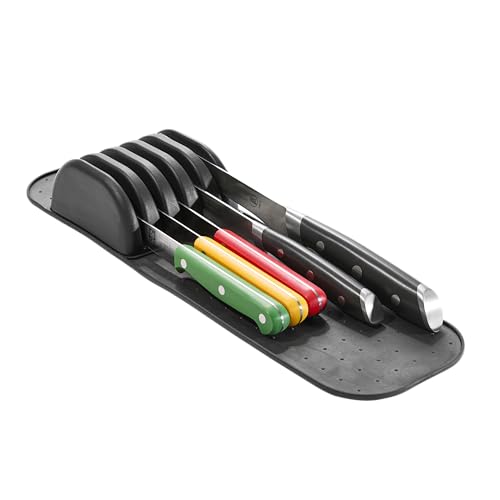
An in-drawer knife tray is the safest option for homes with kids. The tray drops flat inside a standard kitchen drawer, holding each blade separated in its own wooden slot. Handles face forward, so you never touch an exposed cutting edge while opening the drawer. This design takes zero counter or wall space, though it does claim one of your shallow kitchen drawers.
Individual wooden or leather sheaths work best for specialty pieces, travel rolls, or hunting knives. A sheath wraps closely around a single blade, shielding the steel from contact inside a drawer or backpack. If you only need to store one or two large knives rather than a full everyday set, making individual covers requires far fewer tools and materials than building a full wall rack.
Build a Hidden-Magnet Wood Strip for Wall Storage
A hidden-magnet knife bar looks like a clean, solid plank of hardwood floating on your wall. The magnets sit completely inside pockets drilled from the back side, leaving a smooth wooden face that never scratches your blades. You can build this in an afternoon using basic hand tools and standard hardware store supplies.
- Select and cut your hardwood board. Choose a dry piece of dense hardwood such as walnut, hard maple, cherry, or oak. Softwoods like pine dent easily and do not hold screws well over time. Cut the board to length, usually 12 to 16 inches long, about 2.5 to 3 inches wide, and roughly 3/4 inch thick. Sand the front face and edges smooth with 120-grit, then 220-grit sandpaper.
- Mark the pocket locations on the back. Flip the board to the back side. Draw a straight centerline down the length of the board. Plan for two parallel rows of magnets so tall blades cannot swivel or twist. Space the magnet centers roughly 1.5 to 2 inches apart along the length. Leave at least 1.5 inches of solid wood at each end of the board for your wall mounting screws.
- Bore the magnet pockets with a flat-bottom bit. Use a flat-bottom drill bit (known in woodworking as a Forstner bit) that matches your magnet diameter, usually 3/4 inch or 1 inch. Wrap a piece of blue painter tape around the drill bit shank to mark your stopping depth. Drill straight down into your marked points, leaving roughly 1/16 to 1/8 inch of wood between the bottom of the hole and the front face of the board. Take your time, checking depth frequently so you do not punch through the finished front face.
- Secure the magnets with epoxy. Place your super-strong rare-earth magnets (neodymium magnets) into the drilled pockets. Mix a small batch of standard two-part epoxy glue. Apply a generous dab of epoxy into each pocket and press the magnets firmly against the wood bottom. If you use multiple magnets in one hole, make sure their poles attract rather than repel each other before the glue sets. Let the epoxy cure fully for 24 hours.
- Seal and condition the wood. Wipe away any wood dust. Rub the entire board with food-safe mineral oil or cutting board wax. Apply two or three light coats, allowing the oil to soak in for twenty minutes before wiping off the excess with a clean cloth. The oil brings out the natural wood grain and protects the holder from kitchen moisture and steam.
Follow Exact Spacing and Thickness Rules to Prevent Slipping
The biggest risk with a DIY magnetic knife strip is weak holding power. If the wood front is too thick or the magnets are too weak, heavy blades will slide down or fall off when bumped. Follow this checklist before gluing your components together:
- Wood face thickness: Keep the remaining wood between the magnet and the front face between 1/16 inch and 1/8 inch thick. If the wood is thicker than 1/8 inch, magnetic pull drops off sharply. If it is thinner than 1/16 inch, the wood can crack or blister when a heavy knife snaps against it.
- Magnet grade: Buy neodymium disc magnets rated N42 or N52. Do not use dark gray ceramic craft magnets or flexible magnetic tape, because they lack the strength to hold steel through a layer of hardwood.
- Double-magnet layout: Use two magnets for each knife position, stacked vertically about 1.5 inches apart. A single magnet creates a pivot point, allowing a chef knife to spin sideways when you touch its handle. Two magnets hold both the top and lower parts of the blade flat against the strip.
- Blade clearance: Space knife locations at least 2 inches apart from center to center. This leaves ample room for your fingers to grasp the handle without bumping the blade next to it.
- Weight matching: Blades made from heavy German high-carbon steel knives carry thick spines and full tang construction, where one solid piece of blade steel extends all the way through the handle. These heavy blades demand maximum magnetic contact, whereas smaller paring knives need much less pull.
Craft an In-Drawer Organizer Tray with Hand Saws and Glue
If you prefer to keep your counter and wall space completely clear, an in-drawer slotted tray is the ideal project. It requires no specialized routing machinery. You can assemble clean blade slots simply by gluing pre-cut wood strips onto a thin wooden base.
- Measure your drawer interior. Measure the inside length, width, and depth of your kitchen drawer with a tape measure. Subtract 1/4 inch from both the length and width so the finished tray slides in and out easily for cleaning. Check drawer clearance height to make sure tall knife handles will not jam against the drawer frame when opening.
- Cut the baseboard and side rails. Cut a flat piece of 1/4-inch plywood or thin hardwood to match your measured drawer dimensions. Cut two hardwood side strips that match the full length of the baseboard, about 1.5 inches tall and 1/2 inch wide. Glue and clamp these side strips along the outer edges of the baseboard to create a shallow, open tray frame.
- Build blade channels with spacer strips. Instead of attempting to cut deep, narrow slots with a handsaw, build slots by gluing thin wooden spacers across the tray. Cut hardwood divider strips roughly 1/2 inch wide and 1 inch tall. Space them apart by the thickness of your knife blades, typically 1/8 to 3/16 inch. Lay your widest kitchen blade in place as a physical guide while gluing each divider down to the baseboard with standard wood glue.
- Add an angled handle support block. Knife handles are significantly thicker than blade steel. If blades sit flat without handle support, the knife tips tilt upward toward your hand. Cut a small wedge-shaped block of wood and glue it near the front of the tray where the knife bolsters rest. This keeps the blades level inside their slots and protects the delicate 15-degree slicing edges on fine high-carbon Japanese kitchen knives from rubbing against the tray bottom.
- Clamp, cure, and sand. Clamp the glued pieces firmly with spring clamps or weigh them down with heavy books for at least two hours. Once dry, sand any sharp corners smooth by hand. Coat the organizer with food-safe mineral oil to prevent the raw wood from drying out or absorbing cooking smells inside the drawer.
Anchor the Holder Firmly and Practice Safe Blade Handling
A knife holder is only as safe as its mounting hardware. Never use double-sided foam tape or adhesive mounting squares to hang a magnetic knife rack. Kitchen humidity, grease from cooking, and the daily pulling force of removing knives will eventually break the adhesive bond, causing loaded blades to drop onto your counter or floor.
Always mechanically fasten a wall strip using steel screws. If possible, drive at least one screw directly into a wall stud behind your drywall. If no stud is available where you want the holder, use threaded metal drywall anchors rated for at least fifty pounds. You can counter-bore screw holes straight through the front face of the board and cover the screw heads with matching wood plugs, or cut keyhole mounting slots into the back of the board for completely hidden screws.
Mount the holder in a sensible location. Place it high enough that small children cannot reach it, but low enough that you do not have to stretch awkwardly over hot burners or boiling pots. Keep it away from swinging cabinet doors that could knock against exposed knife handles.
Once your holder is mounted, teach everyone in your household the correct way to pull a knife off a magnetic bar. Never pull the knife straight toward you. Pulling straight out requires hard force, which can jerk the strip, rock the screws loose, or cause you to lose your grip. Instead, place your hand on the handle and twist your wrist so the sharp edge rolls off the wood first, pivoting on the dull spine. When putting the knife away, touch the spine to the wood first, then let the flat side of the blade rest against the bar. This simple rolling motion preserves the sharpened edge and keeps total control in your hand.
Consider Ready-Made Sheaths and Blocks if You Lack Workshop Tools
Building your own storage holder gives you custom dimensions and lets you match your kitchen woodwork, but it requires basic tools like drills, clamps, saws, and measuring equipment. If you live in an apartment without a work area or do not have access to power tools, buying a ready-made storage option is far safer than attempting to build one without the proper gear.
When selecting a manufactured holder, focus on construction materials and mounting quality. Look for solid hardwood strips that use continuous internal neodymium magnets rather than small individual magnetic spots, which can leave dead zones where blades slide. If you choose an in-drawer insert, check that the slots are wide and deep enough to accommodate large chef knives with tall blade profiles. High-grade magnetic knife blocks and storage strips offer solid wood faces and heavy weighted bases that hold cutlery safely right out of the box with zero workshop assembly required.

- TAR Score9.6
TAR Score is a ranking system developed by TopAppliancesReviews.com. TAR score has no relationship or impact from any manufacturers or sales agent websites. Learn more
- BrandSchiffer Publishing

- TAR Score9.4
TAR Score is a ranking system developed by TopAppliancesReviews.com. TAR score has no relationship or impact from any manufacturers or sales agent websites. Learn more
- BrandSchiffer Publishing

- TAR Score9.2
TAR Score is a ranking system developed by TopAppliancesReviews.com. TAR score has no relationship or impact from any manufacturers or sales agent websites. Learn more
- BrandZelikovitz
- TAR Score9.2
TAR Score is a ranking system developed by TopAppliancesReviews.com. TAR score has no relationship or impact from any manufacturers or sales agent websites. Learn more
- Brandmadesmart

- TAR Score9.2
TAR Score is a ranking system developed by TopAppliancesReviews.com. TAR score has no relationship or impact from any manufacturers or sales agent websites. Learn more
- BrandSchiffer Publishing

- TAR Score9.0
TAR Score is a ranking system developed by TopAppliancesReviews.com. TAR score has no relationship or impact from any manufacturers or sales agent websites. Learn more
- BrandRealeather

- TAR Score9.0
TAR Score is a ranking system developed by TopAppliancesReviews.com. TAR score has no relationship or impact from any manufacturers or sales agent websites. Learn more
- BrandHOSHANHO

- TAR Score8.2
TAR Score is a ranking system developed by TopAppliancesReviews.com. TAR score has no relationship or impact from any manufacturers or sales agent websites. Learn more
- BrandCedar Lane Press

- TAR Score7.4
TAR Score is a ranking system developed by TopAppliancesReviews.com. TAR score has no relationship or impact from any manufacturers or sales agent websites. Learn more
- BrandN/A

- TAR Score7.2
TAR Score is a ranking system developed by TopAppliancesReviews.com. TAR score has no relationship or impact from any manufacturers or sales agent websites. Learn more
- BrandZelikovitz
Last update on 2026-10-02 / Affiliate links / Images, Product Titles, and Product Highlights from Amazon Product Advertising API
FAQs
Can I use regular ceramic craft magnets instead of rare-earth magnets?
No, standard gray ceramic craft magnets lack the strength needed for a hidden-magnet wood holder. Wood weakens magnetic pull quickly as distance increases. Super-strong rare-earth neodymium magnets are required to reach through the 1/16-inch to 1/8-inch layer of hardwood and hold heavy steel blades securely without slipping.
Will a magnetic wood strip scratch or damage my knife blades?
A properly built wooden magnetic holder will not scratch your blades. Because the magnets sit completely buried behind a smooth layer of hardwood, the steel knife only touches finished wood. Hardwood is much softer than hardened cutlery steel, so it protects the polished blade surface and prevents edge dulling.
What is the best wood species to use for a kitchen knife holder?
Dense, closed-grain hardwoods such as hard maple, black walnut, cherry, and white oak are the best choices. These woods resist dents, machine cleanly without tearing, and stand up well to kitchen humidity. Avoid softwoods like pine or cedar, which dent easily and can split under screw pressure.
How do I clean and maintain a wooden knife holder?
Wipe the wood surface down periodically with a slightly damp cloth and dry it immediately with a towel. Never soak the holder in water or spray harsh kitchen degreasers directly onto the wood. Rub a fresh coat of food-grade mineral oil into the wood every six months to prevent drying, cracking, and moisture absorption.


Top Rated Best Quality Range Hoods: 2026 Expert Picks
The 12 Best Small Solar Generators 2026

10 Best Quality Semi Automatic Washing Machine of 2026 For Leak-Free Laundry

11 Best Small Washer Machine of 2026 For Everyday Laundry

12 Best Vibration Pads For Washing Machine of 2026 To Stop Walking and Shaking

11 Best Selling Front Load Washing Machine of 2026 For Quiet Odor-Free Laundry

11 Best Washing Machine For King Size Bedding of 2026 To Prevent Cycle Errors

10 Best Small Front Loader Washing Machine of 2026 For Tight Closets