
How to Make a Balisong Knife That Flips Smoothly

Start by drafting your pivot layout on paper before cutting any steel. Exact hole placement controls how the handles swing around the tang (the base of the blade where handles attach), making precise drilling the secret to a smooth project. Successfully building a butterfly knife requires shaping a balanced blade and two handles, then securing the pivot points so everything rotates freely. Missing these marks by even a hair causes stiff binding or sloppy blade wobble.
How you tackle the build depends on your workshop setup and design goals. Using a drill press gives you the square holes needed for smooth movement, while basic hand drills require extra patience and careful filing. Layering flat metal plates to make sandwich handles is much easier for beginners than hollowing out solid bars. Choosing to make an unsharpened practice trainer also keeps things safe while you dial in the balance. Here is how to measure, drill, and assemble the pieces correctly.
Balisong Anatomy, Pivot Geometry, and Essential Workshop Tools
Building a butterfly knife in a home workshop differs completely from shaping a standard fixed blade or folding pocket knife. A standard folding pocket knife relies on a liner lock (the spring bar inside the handle that snaps behind the open blade to stop it from closing on your fingers) to stay rigid. A balisong has no internal locking bar. Instead, it relies on two independent handles that counter-rotate around the tang (the base of the blade where handles attach), locking open or closed purely through the grip of your hand.
Every clean flip comes down to precise pivot geometry. If the pivot holes in the blade tang sit even a fraction of an inch too close together, the handles will collide before the knife can fold shut. If they sit too far apart, the handles will spread wide when open, making the knife clumsy and off-balance. Hardened stop pins (steel pegs that halt handle travel) must contact the tang kick at the exact moment the handles line up. If stop pins strike too early, the knife will not close; if they strike late, the handles pinch your fingers or let the blade edge crash into the spacers.
For a home maker, sandwich handles (handles made by stacking flat metal liners and spacers) are far easier to produce than channel handles (handles carved from a single piece of stock). Channel handles require a milling machine or hours spent clearing metal with hand chisels. Sandwich handles allow you to use flat sheet stock that you can cut, drill, and smooth using basic shop tools.
Before cutting any metal, gather these essential materials and tools:
- Blade steel: Annealed 1/8-inch flat bar stock of high-carbon tool steel, such as 1084 or D2. High-carbon steel is easy to grind and heat-treat at home, though it requires light oiling to prevent rust spots, similar to the care needed for German high carbon steel knife sets.
- Handle stock: Four flat plates of 1/8-inch or 3/32-inch aluminum, brass, or stainless steel (rust-resistant, easy-to-clean metal) to form the handle sides.
- Spacers: Solid blocks of steel, brass, or composite matching blade tang thickness plus two washers.
- Hardware: Two threaded pivot barrels with matching screws, two hardened 1/8-inch steel stop pins, and four phosphor bronze washers.
- Essential tools: A drill press or rigid drill guide, metal drill bits, digital calipers, a center punch, hand files, a bench vise, and fine metal sandpaper.
Shaping the Blade and Drilling the Critical Holes
Drilling the pivot holes is the most exacting step. Crooked holes cause handles to bind, wobble, or scrape the blade. Drilling before profiling the rest of the blade protects your stock and prevents alignment mistakes.
- Draft and verify your template on cardstock. Draw the blade and handles on cardstock. Ensure the distance between pivot centers equals handle width plus 1/16 inch of clearance. Cut out the pieces, pin them to cardboard through the pivot marks, and rotate the handles. Confirm the blade tip stays buried when closed and the handles rest parallel when open.
- Mark and center punch the tang. Glue your paper pattern onto your flat steel stock using a glue stick. Use digital calipers to locate the exact center of both pivot holes and the stop pin contact shoulders. Scribe crosshairs at each location. Place a sharp center punch directly on the crosshairs and strike it firmly with a hammer. That dimple stops the drill bit from wandering off course when it touches the steel.
- Drill the holes while the steel bar is square. Drilling into a rectangular bar of steel is much safer and more accurate than trying to clamp an irregularly shaped blade blank. Clamp the steel bar firmly to your drill press table. Apply a drop of cutting oil, set the drill press to a low speed, and drill a pilot hole with a 1/16-inch bit. Follow with a bit sized exactly to your pivot barrels. Keep the bit at a clean 90-degree angle so the hole passes straight through the tang without tilting.
- Rough-cut the blade profile. Clamp the steel bar in a bench vise. Cut away excess stock with a hacksaw or an angle grinder fitted with a cutoff wheel. Make straight relief cuts up to the outline, then remove the waste in small blocks. Stay 1/32 inch outside the lines to leave room for filing.
- File the profile and leave the edge dull. Work down to your layout lines using a clean, flat hand file. When shaping the blade bevels (the sloped sides that taper down toward the cutting edge), stop early. Leave the edge completely dull, with a flat landing at least 1/16 inch wide. Keeping the blade dull protects your fingers from deep cuts while you dry-fit the handles dozens of times during final assembly.
Building Sandwich Handles, Tuning the Swing, and Fixing Common Snags
Once the blade tang is drilled and profiled, you can build the handles and tune the rotation. A smooth action relies on matching handle halves, correct spacer thickness, and clean bearing surfaces.
- Drill handle liners in matched pairs. A balisong uses a safe handle over the dull spine and a bite handle over the sharp edge. To ensure both handles swing identically, clamp two liner plates in a drill vise and drill through both simultaneously. Mark this pair as the safe handle, then repeat for the bite handle. Drilling in pairs guarantees that opposite pivot holes match exactly.
- Shape the rear handle spacers. The rear spacer sits between the liners at the bottom of each handle. Its thickness must equal the blade tang plus two bronze washers. For a 0.125-inch tang and two 0.015-inch washers, the spacer must measure exactly 0.155 inches. Measure with calipers. If the spacer is too thin, the handle pinches the blade shut; if too thick, the handle flares open and rattles. Secure each spacer with screws or pins.
- Assemble the dry pivot stack. Slide a pivot barrel through the outer liner plate. Place a bronze washer on the barrel, slip on the blade tang, add the second washer, and place the inner liner on top. Fasten the pivot screw until snug, then repeat the process for the second handle.
Tuning requires balancing blade play (loose handle wobble from side to side) against friction. When held upright, each handle should drop freely under its own weight without binding. If a handle sticks, the pivot screw is overtightened, a liner is bowed, or a burr (the rough wire edge of metal left by drilling) is dragging on the washer. Disassemble the pivot, deburr hole rims with a countersink bit, and smooth the washers on 1000-grit sandpaper.
Blade rub happens when the blade scrapes against the inside of the handle channels during a flip. Check the knife against a light source with the handles closed. If the blade leans toward one side, check if a liner is slightly warped. You can gently straighten warped plates by hand in a vise with padded jaws. Also verify that your spacer matches your pivot stack thickness; a narrow spacer pinches the liners inward, causing the blade to scrape.
If your handles pinch together and crush your fingers when opened, your stop pin contact points need work. The stop pin halts handle travel when it strikes the tang shoulder. If the handles close too far, remove metal from the inner handle shoulders with a small needle file, checking the fit after every few strokes until the handles rest parallel.
Why Commercial Practice Trainers Make Great Workshop Blueprints
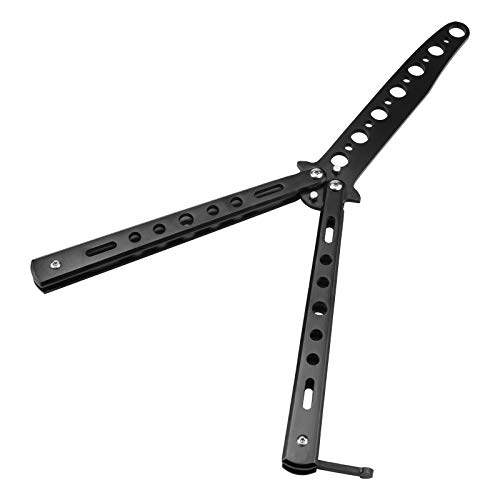
Before cutting into raw tool steel or expensive handle materials, working with a commercial butterfly knife trainer can save you substantial time and frustration. A practice trainer uses a blunt, unsharpened blade with rounded edges and skeletonized holes. Instead of guessing your dimensions from paper diagrams, a commercial trainer gives you a physical model you can handle, measure, and inspect.
You can take a commercial trainer apart using basic hand tools to measure the parts with your calipers. Check the exact spacing between the pivot holes and observe how the tang shoulders catch the stop pins. Look closely at whether the trainer uses simple washers or a bushing (a small metal ring that lets handles swing smoothly around the pivot without loosening the screw). Studying these clearances in three dimensions shows you exactly how much room your own parts need to move freely without binding.
Building and owning butterfly knives also involves strict legal rules that vary depending on your state and municipality. Live cutting blades face strict carry bans or weapon restrictions in many areas, while unsharpened trainers with blunt blades are classified as practice tools. Building a dull practice blade first lets you master handle spacing, weight balance, and pivot tuning safely. You can flip your completed knife without the fear of hand cuts or legal trouble, sharpening the edge only when you are certain your mechanics are dialed in.
When picking a trainer to guide your build, look for a model constructed with screws rather than pressed rivets so you can disassemble it easily. Look for solid channel or sandwich handles made from aluminum or stainless steel, and check that it weighs between 4 and 5 ounces with an overall length around 9 to 10 inches. These standard proportions give you a dependable baseline for your own workshop project.

- TAR Score10.0
TAR Score is a ranking system developed by TopAppliancesReviews.com. TAR score has no relationship or impact from any manufacturers or sales agent websites. Learn more
- BrandMajosta

- TAR Score8.8
TAR Score is a ranking system developed by TopAppliancesReviews.com. TAR score has no relationship or impact from any manufacturers or sales agent websites. Learn more
- BrandVORNNEX

- TAR Score8.6
TAR Score is a ranking system developed by TopAppliancesReviews.com. TAR score has no relationship or impact from any manufacturers or sales agent websites. Learn more
- BrandKEEDAS

- TAR Score8.6
TAR Score is a ranking system developed by TopAppliancesReviews.com. TAR score has no relationship or impact from any manufacturers or sales agent websites. Learn more
- BrandKEEDAS
- TAR Score8.2
TAR Score is a ranking system developed by TopAppliancesReviews.com. TAR score has no relationship or impact from any manufacturers or sales agent websites. Learn more
- BrandLittle World

- TAR Score8.0
TAR Score is a ranking system developed by TopAppliancesReviews.com. TAR score has no relationship or impact from any manufacturers or sales agent websites. Learn more
- BrandBILYSKEP

- TAR Score7.6
TAR Score is a ranking system developed by TopAppliancesReviews.com. TAR score has no relationship or impact from any manufacturers or sales agent websites. Learn more
- BrandLittle World

- TAR Score7.2
TAR Score is a ranking system developed by TopAppliancesReviews.com. TAR score has no relationship or impact from any manufacturers or sales agent websites. Learn more
- BrandMajosta
Last update on 2026-10-02 / Affiliate links / Images, Product Titles, and Product Highlights from Amazon Product Advertising API
FAQs
How do I keep balisong pivot screws from vibrating loose?
The repeated impact of flipping naturally loosens threaded pivot screws. Clean the screw threads and pivot barrels thoroughly with rubbing alcohol to remove grease. Apply a small drop of medium-strength blue thread-locking compound to the screw threads before final assembly. Adjust the screw tension so the handle swings freely without blade play, then allow the thread locker to cure undisturbed for 24 hours.
Can I build a working balisong knife without a drill press?
You can build a balisong with a handheld power drill, but keeping holes square requires extreme care. A tilted pivot hole causes handles to bind against the tang or wobble diagonally. If you must use a hand drill, clamp the steel flat, drill a small pilot hole first, and use a handheld drill guide block to keep the drill bit at a strict 90-degree angle to the workpiece.
What is the difference between washer pivots and bushing pivots?
A washer system places thin bronze rings directly between the blade tang and handle liners, relying on screw tension to balance friction and blade play. A bushing system adds a tiny, hardened metal sleeve inside the tang hole that is slightly thicker than the blade. The handle liners clamp tight against the bushing rather than the blade, allowing you to tighten pivot screws fully while the blade swings completely free.


Top Rated Best Quality Range Hoods: 2026 Expert Picks

The 12 Best Small Solar Generators 2026

10 Best Quality Semi Automatic Washing Machine of 2026 For Leak-Free Laundry

11 Best Small Washer Machine of 2026 For Everyday Laundry

12 Best Vibration Pads For Washing Machine of 2026 To Stop Walking and Shaking

11 Best Selling Front Load Washing Machine of 2026 For Quiet Odor-Free Laundry

11 Best Washing Machine For King Size Bedding of 2026 To Prevent Cycle Errors

10 Best Small Front Loader Washing Machine of 2026 For Tight Closets






